Ved at bruge denne side, du accepterer Privatlivspolitik.
Acceptere
EnterineEnterineEnterine
  • HJEM
  • Det pro
  • Teknik
  • Microsoft
    • Azurblå
    • Configmgr/SCCM
    • DPM
    • Orkester
    • Hyper-V
    • Microsoft Edge Insider
    • MSI
    • Kontor 365
    • Office Insider
    • Power BI
    • Skype
    • SQL Server
    • Hold
  • Windows
    • Windows Admin Center
    • Windows klient
    • Windows Server
  • SCCM-forespørgselsindsamlingsliste
Læsning: How to Create SQL Server 2016 Firewall Rules using GUI and PowerShell
Font ResizerAa
EnterineEnterine
Font ResizerAa
  • HJEM
  • Det pro
  • Teknik
  • Microsoft
  • Windows
  • SCCM-forespørgselsindsamlingsliste
Søge
  • HJEM
  • Det pro
  • Teknik
  • Microsoft
    • Azurblå
    • Configmgr/SCCM
    • DPM
    • Orkester
    • Hyper-V
    • Microsoft Edge Insider
    • MSI
    • Kontor 365
    • Office Insider
    • Power BI
    • Skype
    • SQL Server
    • Hold
  • Windows
    • Windows Admin Center
    • Windows klient
    • Windows Server
  • SCCM-forespørgselsindsamlingsliste
SQL Server

How to Create SQL Server 2016 Firewall Rules using GUI and PowerShell

Offentliggjort: februar 11, 2024
2 Min læst
DELE

How to Create SQL Server 2016 Firewall Rules using GUI and PowerShell.

Indhold
With GUI:With PowerShell:

With GUI:

  1. Start the system and log in (with admin rights user);

2. Åben Control Panel. Click on Windows Firewall;

3. After that click on Advanced Settings;

4. Windows Firewall console open. If you click on Properties (right side) – you can disable firewalls for all networks. We going to Inbound Rules (left side) for our rule creation;

5. Click on New Rule;

6. Rule creation process begins. In my case, I create a rule for Inbound TCP ports. For Rule Type select option Port og klik Next;
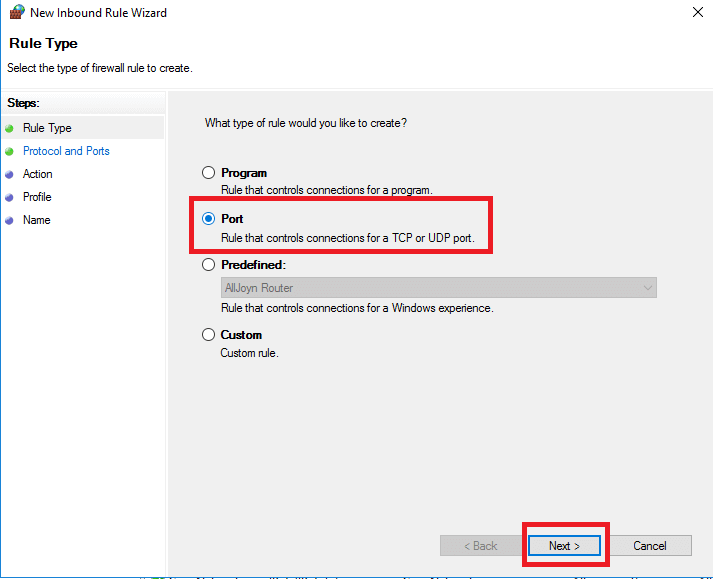
7. For Protocol and Ports select option TCP og Special Local Ports. I use 2 ports for SCCM deployment (8080, 14331) and also added standard SQL TCP ports (1433,1434,4022). After entering ports click Next;

8. For Action (in this case leave by default Allow the connection). Klik Next;

9. For Profile, leave by default, click Next;

10. Enter a name for your rule (for example SQL TCP Ports), so you can easily find it in the future. Klik Finish;

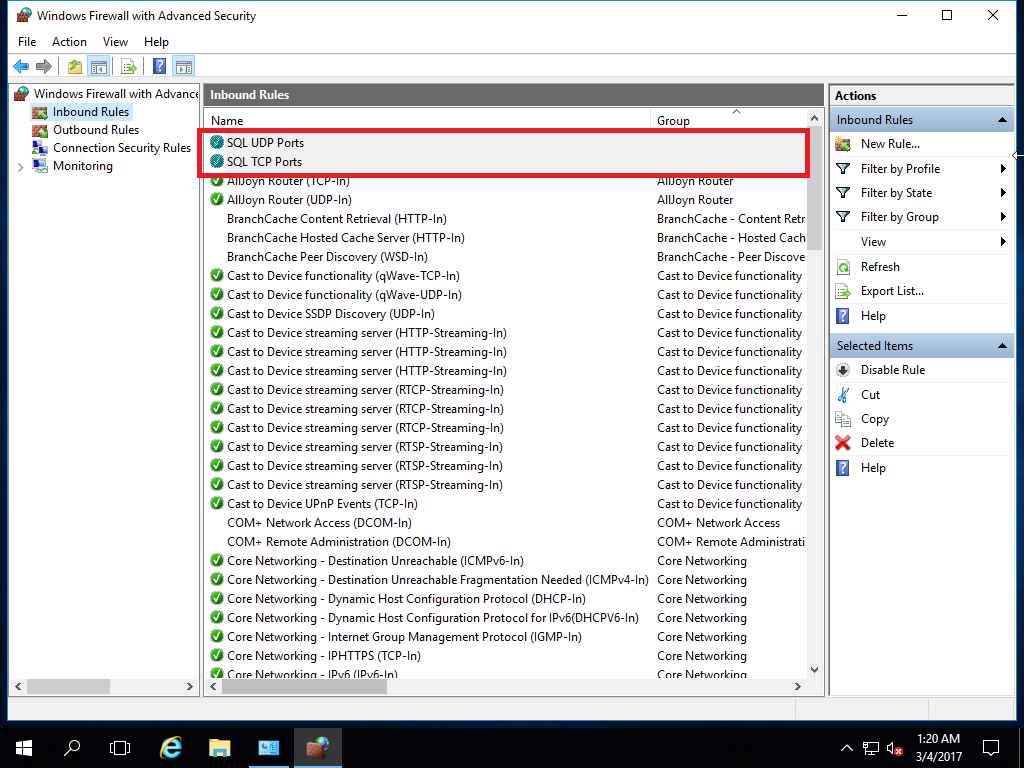
11. In the last screenshot, you see two rules, which I created for SQL Server. One for TCP ports and one for UPD port (1434).

With PowerShell:

  1. Run PowerShell as Administrator;

2. Enter text and press Indtast:

New-NetFirewallRule -DisplayName "SQL TCP Ports" -Direction Inbound –Protocol TCP –LocalPort 8080, 1433, 1434, 4022, 14331 -Action allow

Some explanations:

-DisplayName “SQL TCP Ports” – Rule Name;

-Direction Inbound – Rule direction;

–Protocol TCP – Protocol (TCP or UDP);

–LocalPort – Your ports;

-Action allow – Allow or Disallow.

TAGGET:Microsoft SQL ServerMicrosoft Windows ServerPowerShellSystemcenterSystem Center Configuration ManagerTeknisk forhåndsvisning
Forrige artikel Improve Configuration Manager Performance: Rebuild Indexes and SQL Memory and Database Limits
Næste artikel Guide to Install SQL Server 2012 for SCCM 2012 R2 | Step-by-Step Tutorial
Efterlad en kommentar Efterlad en kommentar

Efterlad et svar Annuller svar

Din e-mailadresse vil ikke blive offentliggjort. Påkrævede felter er markeret *

Denne side bruger Akismet til at reducere spam. Lær, hvordan dine kommentardata behandles.

Oversættelse

English中文(简体)DanskNederlandsFrançaisDeutschItaliano한국어PolskiPortuguêsRomânăEspañolУкраїнська
ved Transposh - translation plugin for wordpress

Populære indlæg

Systemkrav til Windows Server 2016
Windows Server
Configuration Manager Forespørgselsindsamlingsliste
Configmgr
Struktureret/administreret navigation aktiveret på moderne sider i klassiske teamwebsteder
Teknik
SCCM Kunne ikke hente DP-placeringer som den forventede version fra MP
Configmgr

Seneste indlæg

Installation og konfiguration af Fail2ban til SSH-beskyttelse på Ubuntu 24.04
Linux
Aktivering og konfiguration af FirewallD på AlmaLinux
Linux
Brugeroprettelse og SSH-nøgleopsætning i AlmaLinux
Linux
Sådan nulstiller du adgangskoden på AlmaLinux
Linux

© 2023 Enterine

Gå til mobil version
Velkommen tilbage!

Log ind på din konto

Brugernavn eller e-mail-adresse
Adgangskode

Mistet din adgangskode?