How to Remove Windows Server 2016 DHCP Role.
Contents
With GUI
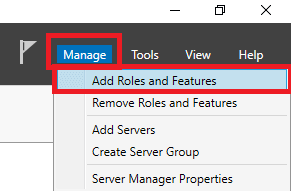
1. In Server Manager, in the upper menu click Manage. Click Remove Roles and Features;

2. For Server Selection, select your server and click Next;
3. For Server Roles, deselect DHCP Server;
4. In the pop-up window click Remove Features;
5. Click Next;
6. For Features. Click Next;
7. For Confirmation, click Remove;
8. For Results, click Close;
9. Restart the system;
10. After the system reboots, the role disappears;
With PowerShell
1. Run PowerShell as administrator;
2. For DHCP console removal;
Uninstall-WindowsFeature RSAT-DHCP3. For DHCP Role removal;
Uninstall-WindowsFeature DHCP -Remove4. Reboot the server.
NOTE: After DHCP role uninstalled check ADSI, if you plan to install it again.