By using this site, you agree to the Privacy Policy.
Accept
EnterinITEnterinITEnterinIT
  • HOME
  • IT PRO
  • TECH
  • MICROSOFT
    • Azure
    • ConfigMgr/SCCM
    • DPM
    • Orchestrator
    • Hyper-V
    • Microsoft Edge Insider
    • MSI
    • Office 365
    • Office Insider
    • Power BI
    • Skype
    • SQL Server
    • Teams
  • WINDOWS
    • Windows Admin Center
    • Windows Client
    • Windows Server
  • SCCM Query Collection List
Reading: Install SQL Server 2016 for Configuration Manager
Font ResizerAa
EnterinITEnterinIT
Font ResizerAa
  • HOME
  • IT PRO
  • TECH
  • MICROSOFT
  • WINDOWS
  • SCCM Query Collection List
Search
  • HOME
  • IT PRO
  • TECH
  • MICROSOFT
    • Azure
    • ConfigMgr/SCCM
    • DPM
    • Orchestrator
    • Hyper-V
    • Microsoft Edge Insider
    • MSI
    • Office 365
    • Office Insider
    • Power BI
    • Skype
    • SQL Server
    • Teams
  • WINDOWS
    • Windows Admin Center
    • Windows Client
    • Windows Server
  • SCCM Query Collection List
SQL Server

Install SQL Server 2016 for Configuration Manager

Published: February 5, 2024
2 Min Read
SHARE

Install SQL Server 2016 for Configuration Manager.

1. Mount your “DVD” or “*.iso” with SQL installation files;

2. Run installation and go to “Installation“;

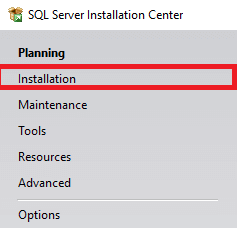
3. Select “New SQL Server stand-alone installation or add features to an existing installation“;

4. Enter your “Product key” and click the “Next” button;

5. Read the License agreement and set the check mark “I accept the license terms“. Click the “Next” button;

6. If you have an Internet connection set the checkmark “Use Microsoft Update to check for updates (recommended)“. Click the “Next” button;

7. Click the “Next” button;

8. After the system check you may get a “Warning” message (it’s normal). Click the “Next” button;

9. Set check mark on:

  • Database Engine Services;
  • Full-Text and Semantic Extractions…;
  • Reporting Services – Native.

After selecting click “Next” button;

10. As you see there is no “SQL Management Studio”, you may install it later by downloading it from the current site.

11. Enter your instance name in “Named instance“, and “Instance ID” set automatically. Click the “Next” button;

12. Set “Service Accounts” for our SQL services (we created them early) and set “Startup Type” to “Automatic“;

13. Set “Collation”:

SQL_Latin1_General_CP1_CI_AS

If you set another collation – check the SCCM documentation! Click the “Next” button;

14. In “Server Configuration” select “Windows authentification mode“. Add user “BUILTIN\Administrator” and local group “<Computer name>\Administrators” by clicking “Add” button;

15. Configure “Data Directories” (path for Databases, Logs, and Backups) for your needs;

16. Configure “TempDB” (path for temp Databases and Logs) for your needs and click the “Next” button;

17. “Reporting Services Configuration” set “Install only“, we configure it later. Click the “Next” button;

18. Click the “Install” button to start installation;

19. Installation starts;

20. Installation succeeded, we can go further and make post-install configurations. Click the “Close” button to close the window;

TAGGED:Microsoft SQL ServerMicrosoft Windows ServerSystem CenterSystem Center Configuration ManagerWindows
Previous Article Configuration Manager Query Collection List Configuration Manager Technical Preview Update 1612
Next Article Hyper-V Virual Machine Restart PowerShell Script
Leave a Comment Leave a Comment

Leave a Reply Cancel reply

Your email address will not be published. Required fields are marked *

This site uses Akismet to reduce spam. Learn how your comment data is processed.

Translation

English中文(简体)DanskNederlandsFrançaisDeutschItaliano한국어PolskiPortuguêsRomânăEspañolУкраїнська
by Transposh - translation plugin for wordpress

Popular Posts

System Requirements for Windows Server 2016
Windows Server
Configuration Manager Query Collection List
ConfigMgr
Structured/Managed Navigation enabled on Modern Pages in Classic Team Sites
Tech
SCCM Failed to get DP locations as the expected version from MP
ConfigMgr

Recent Posts

Installing and Configuring Fail2ban for SSH Protection on Ubuntu 24.04
Linux
Enabling and Configuring FirewallD on AlmaLinux
Linux
User Creation and SSH Key Setup in AlmaLinux
Linux
How to reset password on AlmaLinux
Linux

© 2023 EnterinIT

Go to mobile version
Welcome Back!

Sign in to your account

Username or Email Address
Password

Lost your password?