How to Fix SCCM Cannot Recover the Master Database Error. Configuration Manager SQL Instance service doesn’t start. When you try to start it it’s stopped and brings the next error in Event Log.
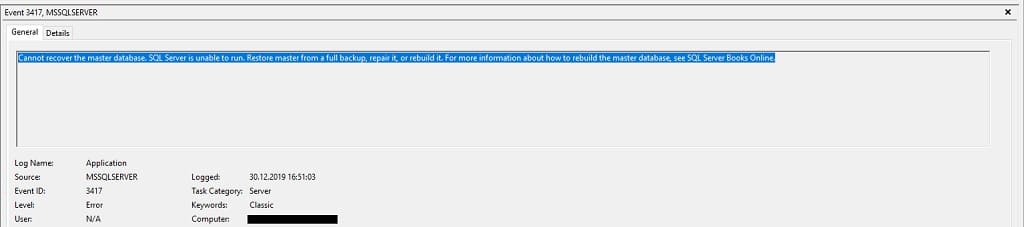
Cannot recover the master database. SQL Server is unable to run. Restore master from a full backup, repair it, or rebuild it. For more information about how to rebuild the master database, see SQL Server Books Online.
Event Log
Soluzione 1: Restore from backup
NOTA: You must have this backup.
Restoring the master database from the SQL server or another backup solution.
1. Eseguire il SQL Server Configuration Manager;
2. Fare clic con il tasto destro del mouse sul SQL Server service e fare clic su Proprietà;
3. After that select the startup parameters tab;
4. Tipo – m in the Specify the startup parameter text box and click the Aggiungere pulsante. Clic Fare domanda a;
6. Restart your SQL Server.
Use the command line in SQL Server Management Studio to restore your SQL server master database from the backup.
1. Navigate to …/Tools/Bin directory and look for sqlcmd.exe;
2. Once located, run the sqlcmd.exe file;
3. Use the – S flag for a private connection. But, if you have a public connection, then use the – U E – P flags;
4. After doing this, you will be able to restore the master database backup easily;
5. Now remove – m flag services from the SQL Server and restart the SQL server to return to the multi-client mode.
NOTA: If you have another backup solution like Data Protection Manager there is a more easy way o restore SQL backup.
Soluzione 2: Rebuild Master database
The following procedure rebuilds the master, model, msdb, and tempdb system databases. You cannot specify the system databases to be rebuilt. For clustered instances, this procedure must be performed on the active node and the SQL Server resource in the corresponding cluster application group must be taken offline before performing the procedure.
This procedure does not rebuild the resource database. See the section, “Rebuild the resource Database Procedure” later in this topic.
To rebuild system databases for an instance of SQL Server:
1. Insert the SQL Server 2019 (15.X) installation media into the disk drive, or, from a command prompt, change directories to the location of the setup.exe file on the local server. The default location on the server is C:\Program Files\Microsoft SQL Server\130\Setup Bootstrap\SQLServer2016.
2. From a command prompt window, enter the following command. Square brackets are used to indicate optional parameters. Do not enter the brackets. When using a Windows operating system that has User Account Control (Uac) enabled, running Setup requires elevated privileges. The command prompt must be run as Administrator.
Setup /QUIET /ACTION=REBUILDDATABASE /INSTANCENAME=InstanceName /SQLSYSADMINACCOUNTS=accounts [ /SAPWD= StrongPassword ] [ /SQLCOLLATION=CollationName]| Parameter name | Description |
| /QUIET or /Q | Specifies that Setup run without any user interface. |
| /ACTION=REBUILDDATABASE | Specifies that Setup re-create the system databases. |
| /INSTANCENAME=InstanceName | Is the name of the instance of SQL Server. For the default instance, enter MSSQLSERVER. |
| /SQLSYSADMINACCOUNTS=account | Specifies the Windows groups or individual accounts to add to the sysadmin fixed server role. When specifying more than one account, separate the accounts with a blank space. For example, entrare BUILTIN\Administrators MyDomain\MyUser. When you are specifying an account that contains a blank space within the account name, enclose the account in double quotation marks. For example, entrare NT AUTHORITY\SYSTEM. |
| [ /SAPWD=StrongPassword ] | Specifies the password for the SQL Server sa account. This parameter is required if the instance uses Mixed Authentication (SQL Server and Windows Authentication) modalità. ** Security Note ** IL sa account is a well-known SQL Server account and it is often targeted by malicious users. It is very important that you use a strong password for the sa login. Do not specify this parameter for Windows Authentication mode. |
| [ /SQLCOLLATION=CollationName ] | Specifies a new server-level collation. This parameter is optional. When not specified, the current collation of the server is used. ** Importante ** Changing the server-level collation does not change the collation of existing user databases. All newly created user databases will use the new collation by default. |
| [/SQLTEMPDBFILECOUNT=NumberOfFiles] | Specifies the number of tempdb data files. This value can be increased up to 8 or the number of cores, whichever is higher. Default value: 8 or the number of cores, whichever is lower. |
| [ /SQLTEMPDBFILESIZE=FileSizeInMB ] | Specifies the initial size of each tempdb data file in MB. Setup allows the size up to 1024 MB. Default value: 8 |
| [/SQLTEMPDBFILEGROWTH=FileSizeInMB] | Specifies the file growth increment of each tempdb data file in MB. A value of 0 indicates that automatic growth is off and no additional space is allowed. Setup allows the size up to 1024 MB. Default value: 64 |
| [/SQLTEMPDBLOGFILESIZE=FileSizeInMB] | Specifies the initial size of the tempdb log file in MB. Setup allows the size up to 1024 MB. Default value: 8. Allowed range: Min = 8, max = 1024. |
| [/SQLTEMPDBLOGFILEGROWTH=FileSizeInMB] | Specifies the file growth increment of the tempdb log file in MB. A value of 0 indicates that automatic growth is off and no additional space is allowed. Setup allows the size up to 1024 MB. Default value: 64 Allowed range: Min = 8, max = 1024. |
| [ /SQLTEMPDBDIR=Directories ] | Specifies the directories for tempdb data files. When specifying more than one directory, separate the directories with a blank space. If multiple directories are specified the tempdb data files will be spread across the directories in a round-robin fashion. Default value: System Data Directory |
| [ /SQLTEMPDBLOGDIR=Directory ] | Specifies the directory for the tempdb log file. Default value: System Data Directory |
3. When Setup has completed rebuilding the system databases, it returns to the command prompt with no messages. Examine the Summary.txt log file to verify that the process completed successfully. This file is located at C:\Program Files\Microsoft SQL Server\130\Setup Bootstrap\Logs.
RebuildDatabase scenario deletes system databases and installs them again in clean state. Because the setting of tempdb file count does not persist, the value of number of tempdb files is not known during setup. Therefore, RebuildDatabase scenario does not know the count of tempdb files to be re-added. You can provide the value of the number of tempdb files again with the SQLTEMPDBFILECOUNT parameter. If the parameter is not provided, RebuildDatabase will add a default number of tempdb files, which is as many tempdb files as the CPU count or 8, whichever is lower.
Nel mio caso, this doesn’t help and finish with error:
Detailed results:
   Feature:                       Database Engine Services
   Status:                        Failed
   Reason for failure:            An error occurred during the setup process of the feature.
   Next Step:                     Use the following information to resolve the error, and then try the setup process again.
   Component name:                SQL Server Database Engine Services Instance Features
   Component error code:          0x851A001A
   Error description:             Wait on the Database Engine recovery handle failed. Check the SQL Server error log for potential causes.
   Error help link:               https://go.microsoft.com/fwlink?LinkId=20476&ProdName=Microsoft+SQL+Server&EvtSrc=setup.rll&EvtID=50000&ProdVer=14.0.3192.2&EvtType=0xD15B4EB2%400x4BDAF9BA%401306%4026&EvtType=0xD15B4EB2%400x4BDAF9BA%401306%4026
I try to change the SQL Instance service run account, but this is doesn’t help.
Soluzione 3: Move to another SQL Server Instance
NOTA: You must have access to SCCM SQL database and *.log file.
1. Install the new SQL Server instance;
2. Open Database file security settings and add Full Control for your current user;
3. Repeat this for *.tronco d'albero file for your database;
4. Attach Configuration Manager to new SQL Instance;
5. Mount Configuration Manager installation *.iso file and run splash.hta;
6. Clic Installare;
7. Clic Prossimo;
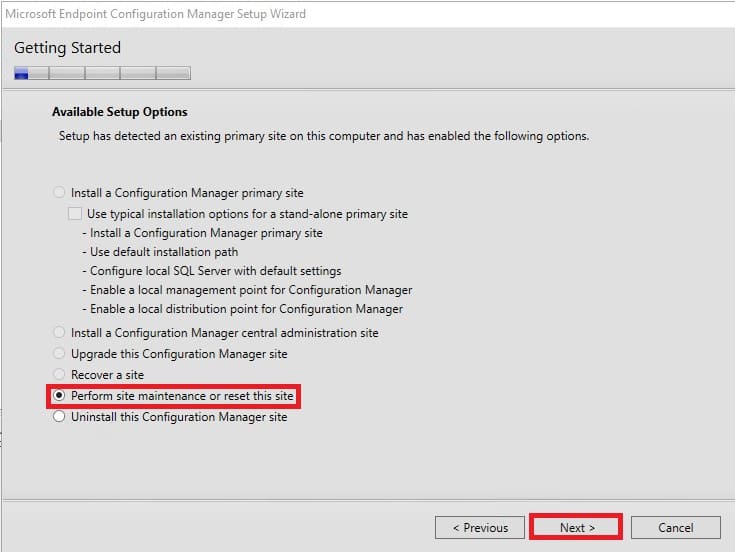
8. Selezionare Perform Site Maintenance or reset this site e fare clic Prossimo;
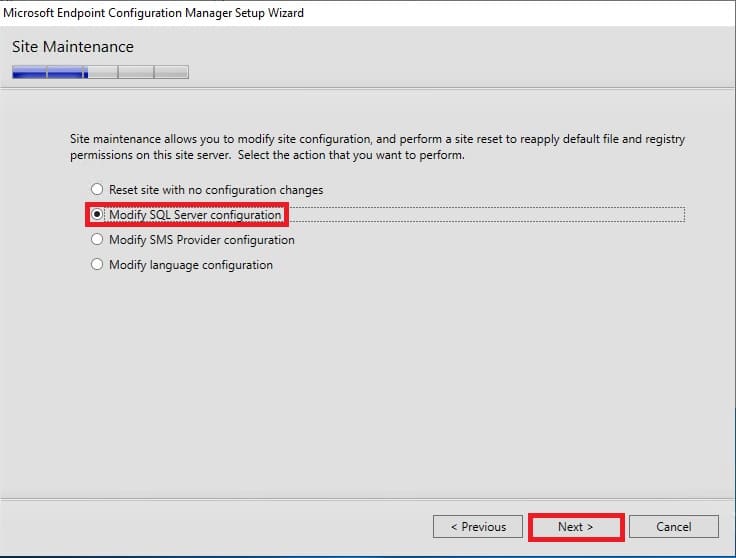
9. Selezionare Modify SQL Server configuration e fare clic Prossimo;
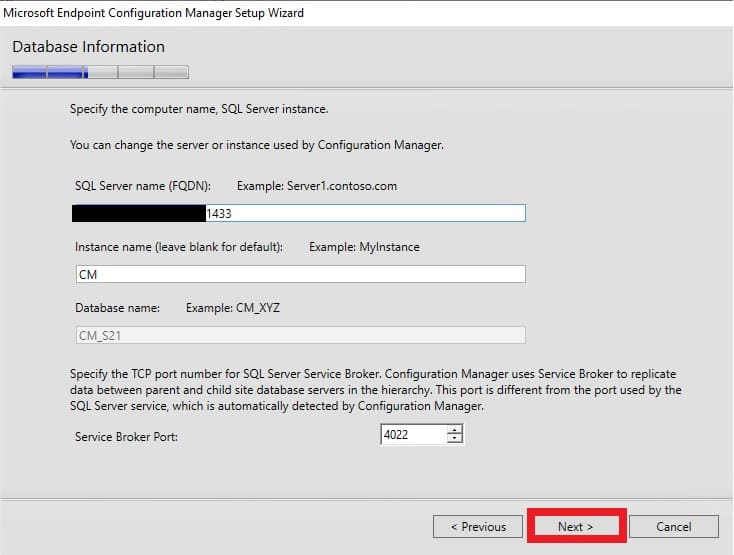
10. Enter new SQL Server instance details and click Prossimo;
11. When the process completes, close the installation wizard.
12. Try to run the Console di Configuration Manager and check that everything is okay.


")


