
A Step-by-Step Guide to Updating Windows Assessment and Deployment Kit (ADK) for Configuration Manager.
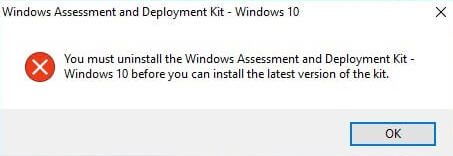
1. If you try to install ADK you will get the next message;
2. So, as the first step – navigate to Control Panel\Programs and Features e Uninstall existing ADK;
3. After uninstalling begin new ADK instalação (Versão 1703);
4. After successful installation starts the SCCM console. Navegue até Software Library\Operating Systems\Boot Images. You may delete old Boot images ou não, as you wish. Neste guia, I delete them. Select Boot image and click Delete in the upper menu;
5. After deleting click Add Boot Image in the upper menu;
6. Clique Navegar e navegue até the file.WIM (use network share path, not local path).
Here are the paths to both WIM:
- X86 WinPE: C:\Arquivos de programas (x86)\Windows Kits\10\Assessment and Deployment Kit\Windows Preinstallation Environment\x86\en-us\winpe.wim
- X64 WinPE: C:\Arquivos de programas (x86)\Windows Kits\10\Assessment and Deployment Kit\Windows Preinstallation Environment\amd64\en-us\winpe.wim
7. After WIM selecting click Próximo;
8. Digitar Nome e Comentário (por padrão Versão already exist), clique Próximo;
9. Clique Próximo;
10. Wait some time;
11. Clique Fechar;
12. Select the newly added Boot image e clique Propriedades in the upper menu;
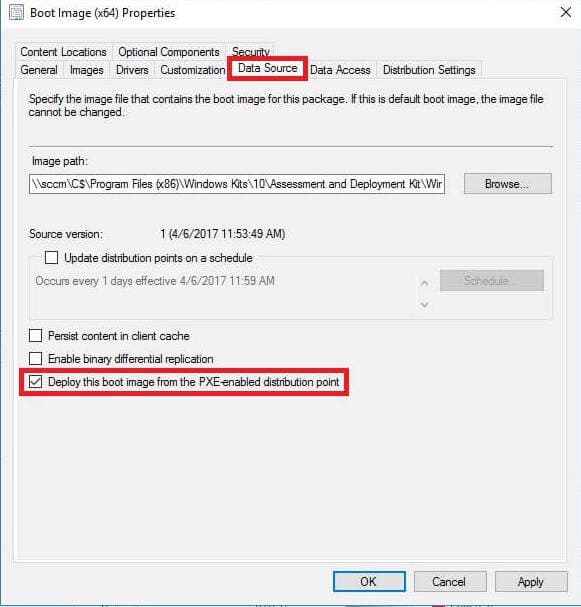
13. Navegue até the Data Source tab and set checkmark Deploy this boot image from the PXE-enabled distribution point;
14. Também, navigate to the Customization tab and set the checkmark Enable command support (testing only), clique OK;
15. In the pop-up choose Não;
16. Selecione Boot image, clique Distribute Content in the upper menu, and distribute it to your Ponto de distribuição;
17. Distribution complete;
18. Navegue até Task Sequences and select your existing Task, clique Propriedades in the upper menu;
19. Em o Advanced tab set a checkmark Use a boot image and click Browse to select the newly added Boot image after that click OK;

Isso é tudo!


")


