Prin utilizarea acestui site, sunteți de acord cu Politica de confidențialitate.
Accepta
EnterineEnterineEnterine
  • ACASĂ
  • Pro
  • Tehnologie
  • Microsoft
    • Azur
    • ConfigMgr/SCCM
    • Dpm
    • Orchestrator
    • Hyper-V
    • Microsoft Edge Insider
    • MSI
    • Birou 365
    • Office Insider
    • Putere bi
    • Skype
    • Server SQL
    • Echipe
  • Ferestre
    • Centrul de administrare Windows
    • Client Windows
    • Windows Server
  • Lista de colecție de interogări SCCM
Lectură: A Step-by-Step Guide to Updating Windows Assessment and Deployment Kit (ADK) for Configuration Manager
Redimensionare fontAa
EnterineEnterine
Redimensionare fontAa
  • ACASĂ
  • Pro
  • Tehnologie
  • Microsoft
  • Ferestre
  • Lista de colecție de interogări SCCM
Căutare
  • ACASĂ
  • Pro
  • Tehnologie
  • Microsoft
    • Azur
    • ConfigMgr/SCCM
    • Dpm
    • Orchestrator
    • Hyper-V
    • Microsoft Edge Insider
    • MSI
    • Birou 365
    • Office Insider
    • Putere bi
    • Skype
    • Server SQL
    • Echipe
  • Ferestre
    • Centrul de administrare Windows
    • Client Windows
    • Windows Server
  • Lista de colecție de interogări SCCM
Configmgr

A Step-by-Step Guide to Updating Windows Assessment and Deployment Kit (ADK) for Configuration Manager

Publicat: February 11, 2024
2 Min Citește
Cota

A Step-by-Step Guide to Updating Windows Assessment and Deployment Kit (ADK) for Configuration Manager.

1. If you try to install ADK you will get the next message;
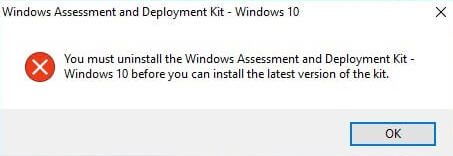
2. So, as the first step – navigate to Control Panel\Programs and Features şi Uninstall existing ADK;

3. After uninstalling begin new ADK installation (Version 1703);

4. After successful installation starts the SCCM console. Navigate to Software Library\Operating Systems\Boot Images. You may delete old Boot images or not, as you wish. In this guide, I delete them. Select Boot image and click Delete in the upper menu;

5. After deleting click Add Boot Image in the upper menu;

6. Click Browse and navigate to the file.WIM (use network share path, not local path).

Here are the paths to both WIM:

  • X86 WinPE: C:\Program Files (x86)\Windows Kits\10\Assessment and Deployment Kit\Windows Preinstallation Environment\x86\en-us\winpe.wim
  • X64 WinPE: C:\Program Files (x86)\Windows Kits\10\Assessment and Deployment Kit\Windows Preinstallation Environment\amd64\en-us\winpe.wim

7. După WIM selecting click Next;

8. Intră Nume şi Comentariu (by default Version already exist), clic Next;

9. Click Next;

10. Wait some time;

11. Click Close;

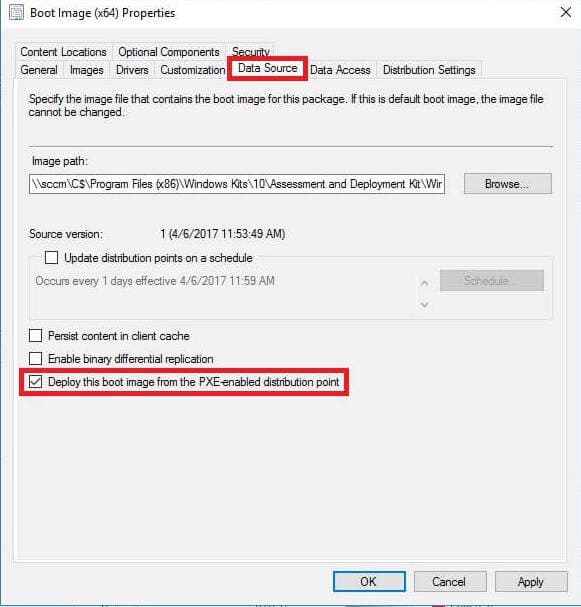
12. Select the newly added Boot image și faceți clic Proprietăți in the upper menu;

13. Navigate to the Data Source tab and set checkmark Deploy this boot image from the PXE-enabled distribution point;
14. Asemenea, navigate to the Customization tab and set the checkmark Enable command support (testing only), clic Bine;

15. In the pop-up choose Nu;

16. Select Boot image, clic Distribute Content in the upper menu, and distribute it to your Punct de distribuție;

17. Distribution complete;

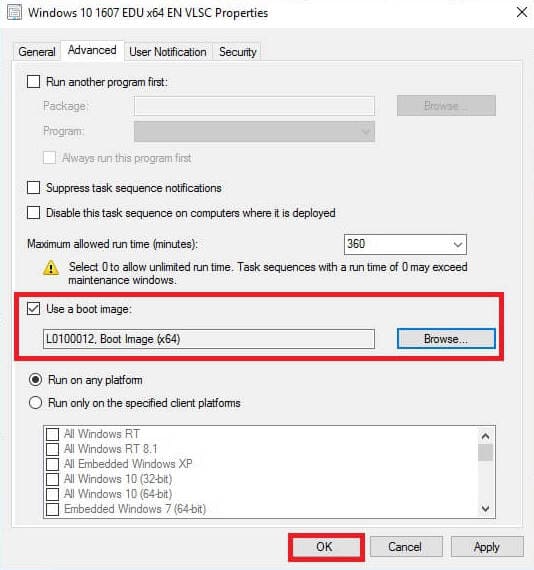
18. Navigate to Task Sequences and select your existing Task, clic Proprietăți in the upper menu;

19. In cel Advanced tab set a checkmark Use a boot image and click Browse to select the newly added Boot image after that click Bine;
Asta e tot!

Etichetat:Centru de sistemManager de configurare System CenterWindows 10
Articolul precedent SCCM deploy Office 365
Articolul următor How to Upgrade SCCM Client on Windows Computers
Lasă un comentariu Lasă un comentariu

Lasă un răspuns Anulează răspunsul

Adresa ta de e-mail nu va fi publicată. Câmpurile obligatorii sunt marcate *

Acest site folosește Akismet pentru a reduce spamul. Aflați cum sunt procesate datele comentariilor dvs.

Traducere

English中文(简体)DanskNederlandsFrançaisDeutschItaliano한국어PolskiPortuguêsRomânăEspañolУкраїнська
de Transposh - translation plugin for wordpress

Postări populare

Cerințe de sistem pentru Windows Server 2016
Windows Server
Lista de colecție de interogări din Configuration Manager
Configmgr
Navigarea structurată/gestionată este activată în paginile moderne din site-urile clasice ale echipelor
Teh
SCCM nu s-a obținut locațiile DP ca versiune așteptată de la MP
Configmgr

Postări recente

Instalarea și configurarea Fail2ban pentru protecție SSH pe Ubuntu 24.04
Linux
Activarea și configurarea FirewallD pe AlmaLinux
Linux
Crearea utilizatorilor și configurarea cheii SSH în AlmaLinux
Linux
Cum să resetați parola pe AlmaLinux
Linux

© 2023 Enterine

Accesați versiunea mobilă
Bine ai revenit!

Conectați-vă la contul dvs

Nume de utilizator sau adresă de e-mail
Parolă

Ți-ai pierdut parola?