Ved at bruge denne side, du accepterer Privatlivspolitik.
Acceptere
EnterineEnterineEnterine
  • HJEM
  • Det pro
  • Teknik
  • Microsoft
    • Azurblå
    • Configmgr/SCCM
    • DPM
    • Orkester
    • Hyper-V
    • Microsoft Edge Insider
    • MSI
    • Kontor 365
    • Office Insider
    • Power BI
    • Skype
    • SQL Server
    • Hold
  • Windows
    • Windows Admin Center
    • Windows klient
    • Windows Server
  • SCCM-forespørgselsindsamlingsliste
Læsning: Configuration Manager How to Install and Configure Distribution Point
Font ResizerAa
EnterineEnterine
Font ResizerAa
  • HJEM
  • Det pro
  • Teknik
  • Microsoft
  • Windows
  • SCCM-forespørgselsindsamlingsliste
Søge
  • HJEM
  • Det pro
  • Teknik
  • Microsoft
    • Azurblå
    • Configmgr/SCCM
    • DPM
    • Orkester
    • Hyper-V
    • Microsoft Edge Insider
    • MSI
    • Kontor 365
    • Office Insider
    • Power BI
    • Skype
    • SQL Server
    • Hold
  • Windows
    • Windows Admin Center
    • Windows klient
    • Windows Server
  • SCCM-forespørgselsindsamlingsliste
Configmgr

Configuration Manager How to Install and Configure Distribution Point

Offentliggjort: februar 11, 2024
3 Min læst
DELE

Configuration Manager How to Install and Configure Distribution Point: Trin-for-trin-guide.

Indhold
Install Distribution PointConfigure the Network Access Account

Install Distribution Point

1. Open your SCCM Console. Go to Administration\Overview\Site Configuration\Servers and Site System Roles;

2. Select your target server, select Distribution Point, and click Properties in the upper menu (or Højre museknap og klik Properties);

3. For the General tab. If you use HTTP don’t forget to enable the checkmark Allow clients to connect anonymously (or you get errors at OSD deployments); Choose the option Import certificate, select your Certifikat, and enter Adgangskode;

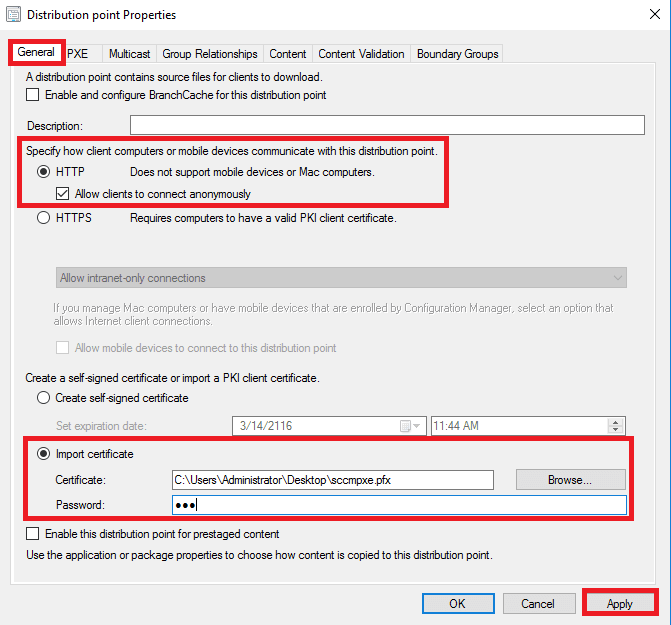
4. Klik Apply and go to the PXE tab.

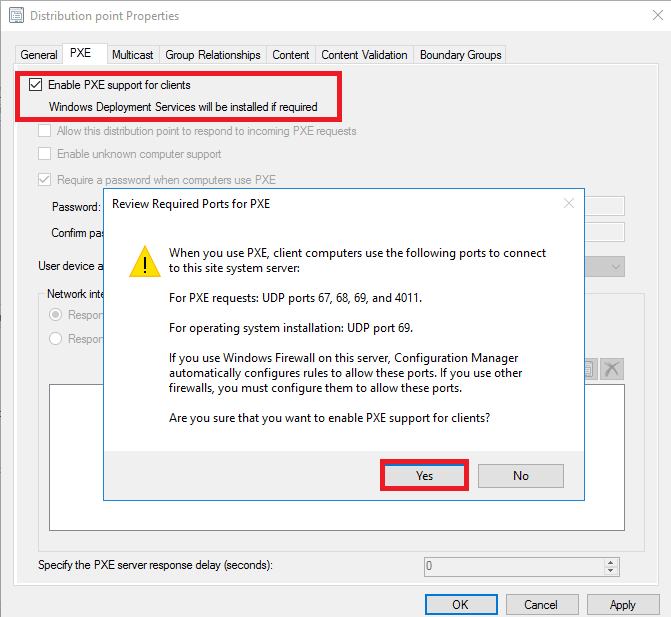
5. For de PXE tab. Enable check mark Enable PXE supports for clients when getting message click Yes (remember this message text, it may help you).

6. Enable check mark Allow this distribution point to respond to incoming PXE requests. Enable check mark Enable unknown computer support og klik OK in the pop-up window;

7. If you have several network interfaces, you may choose who responds to PXE. Also, you may set PXE response delay if you need;

8. Klik Apply and go to the Multicast tab.

9. For the Multicast tab. Enable check mark Enable multicast to simultaneously send data to multiple clients;

10. Go to the Content Validation tab.

11. For the Content Validation tab. Enable check mark Validate content on a schedule;

12. Click the button Schedule and make configuration, when complete click OK;

13. Go to Boundary Groups, if you already config groups for this DP you will see it here. Klik OK;

14. After some time if you open Server Manager you will notice, that the WDS role added;

Configure the Network Access Account

1. Open SCCM Console. Go to Administration\Overview\Site Configuration\Sites. Select your site. Click in upper menu Settings\Configure Site Components\Software Distribution;

2. Go to de Network Access Account tab, select the option Specify the account that access network locations;

3. Click on the “sun” button and choose New Account;

4. Enter your service account User name (also may click Browse and select an account from Active Directory), Adgangskode og Confirm Password, click Verify;

5. Enter the path to a network share on the SCCM server (also may click Browse and select folder)og klik Test connection. In the pop-up window click OK.

6. Klik OK to close the Windows User Account window;

7. Account added, click OK;

TAGGET:Microsoft Windows ServerSystemcenterSystem Center Configuration Manager
Forrige artikel SCCM extend Active Directory Schema app
Næste artikel SCOM free Squared Up Community Edition license
Efterlad en kommentar Efterlad en kommentar

Efterlad et svar Annuller svar

Din e-mailadresse vil ikke blive offentliggjort. Påkrævede felter er markeret *

Denne side bruger Akismet til at reducere spam. Lær, hvordan dine kommentardata behandles.

Oversættelse

English中文(简体)DanskNederlandsFrançaisDeutschItaliano한국어PolskiPortuguêsRomânăEspañolУкраїнська
ved Transposh - translation plugin for wordpress

Populære indlæg

Systemkrav til Windows Server 2016
Windows Server
Configuration Manager Forespørgselsindsamlingsliste
Configmgr
Struktureret/administreret navigation aktiveret på moderne sider i klassiske teamwebsteder
Teknik
SCCM Kunne ikke hente DP-placeringer som den forventede version fra MP
Configmgr

Seneste indlæg

Installation og konfiguration af Fail2ban til SSH-beskyttelse på Ubuntu 24.04
Linux
How to Check Timezone in Linux
Linux
Aktivering og konfiguration af FirewallD på AlmaLinux
Linux
Brugeroprettelse og SSH-nøgleopsætning i AlmaLinux
Linux

© 2023 Enterine

Gå til mobil version
Velkommen tilbage!

Log ind på din konto

Brugernavn eller e-mail-adresse
Adgangskode

Mistet din adgangskode?