Ved at bruge denne side, du accepterer Privatlivspolitik.
Acceptere
EnterineEnterineEnterine
  • HJEM
  • Det pro
  • Teknik
  • Microsoft
    • Azurblå
    • Configmgr/SCCM
    • DPM
    • Orkester
    • Hyper-V
    • Microsoft Edge Insider
    • MSI
    • Kontor 365
    • Office Insider
    • Power BI
    • Skype
    • SQL Server
    • Hold
  • Windows
    • Windows Admin Center
    • Windows klient
    • Windows Server
  • SCCM-forespørgselsindsamlingsliste
Læsning: Master .NET Framework 3.5 Deployment in Configuration Manager
Font ResizerAa
EnterineEnterine
Font ResizerAa
  • HJEM
  • Det pro
  • Teknik
  • Microsoft
  • Windows
  • SCCM-forespørgselsindsamlingsliste
Søge
  • HJEM
  • Det pro
  • Teknik
  • Microsoft
    • Azurblå
    • Configmgr/SCCM
    • DPM
    • Orkester
    • Hyper-V
    • Microsoft Edge Insider
    • MSI
    • Kontor 365
    • Office Insider
    • Power BI
    • Skype
    • SQL Server
    • Hold
  • Windows
    • Windows Admin Center
    • Windows klient
    • Windows Server
  • SCCM-forespørgselsindsamlingsliste
Configmgr

Master .NET Framework 3.5 Deployment in Configuration Manager

Offentliggjort: februar 11, 2024
3 Min læst
DELE

Master .NET Framework 3.5 Deployment in Configuration Manager. Before we begin, download the net 3.5 cab file and copy it into the folder (where you place content for Configuration Manager).

Indhold
Create a Configuration Manager applicationDistribute Content and DeployInstall .NET Framework 3.5 from the Software Center
DOWNLOAD

Create a Configuration Manager application

1. Start the Configuration Manager console and navigate to Software Library\Application Management\Applications. Klik Create Application;

2. Vælge Manually specify the application information og klik Next;

3. Fill in the fields and click Next;

4. Fill in the fields, add Icon;

5. Klik Next;

6. For Deployment Types, click Tilføje;

7. At Type vælge Script Installer, vælge Manually specify the application information og klik Next;

8. Fill in fields and click Next;

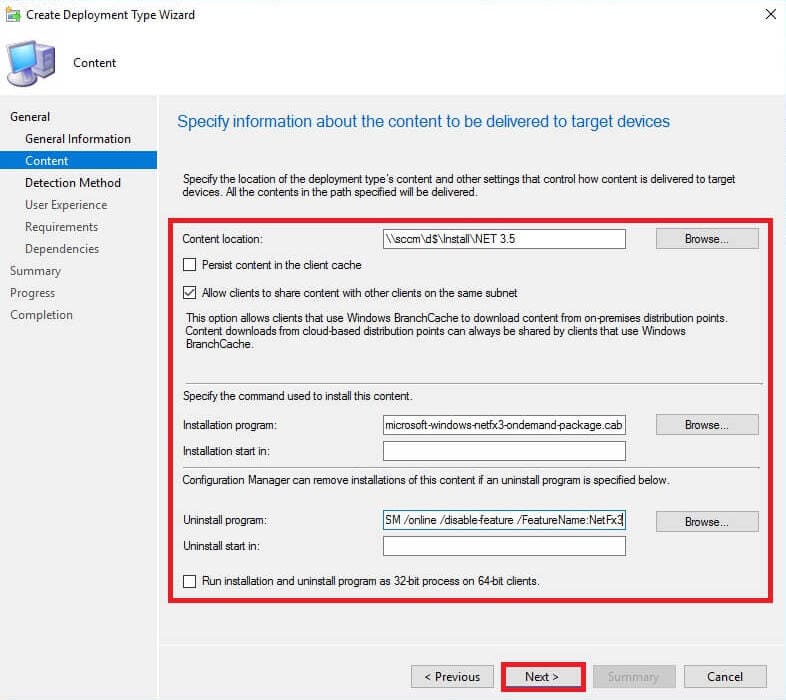
9. Vælge Content-Location. For Installation program use:

dism /online /add-package /packagepath:microsoft-windows-netfx3-ondemand-package.cab

For Uninstall program use:

DISM /online /disable-feature /FeatureName:NetFx3

10. Klik Next;

11. Klik Add Clause, and set Registry. At Hive vælge HKEY_LOCAL_MACHINE.
For Key use:

SOFTWARE\Microsoft\NET Framework Setup\NDP\v3.5

For Value enter Install, for Data Type vælge String. Klik OK;

12. Klik Next;

13. Specify user experience settings for the application and click Summary;

14. Klik Next;

15. Klik Tæt;

16. Deployment type added, click Next;

17. Klik Next;

18. Klik Tæt;

Distribute Content and Deploy

  1. Højre museknap click on the newly added application and select Distribute Content;

2. Klik Next;

3. Klik Next;

4. Tilføje Distribution Point og klik Next;

5. Klik Next;

6. Klik Tæt;

7. Wait some time, refresh the page and you must get Content Status – Success;

8. Højre museknap click on the newly added application and select Deploy;

9. Select the target collection and click Next;

10. Klik Next (We already sent it to Distribution Point);

11. Specify Deployment Settings and click Next;

12. Specify Scheduling og klik Next;

13. Specify User Notifications og klik Next;

14. Specify Alerts og klik Next;

15. Klik Next;

16. Klik Tæt;

We complete the SCCM side, let’s check how it works at the client.

Install .NET Framework 3.5 from the Software Center

1. Log in to the client and start Software Center. You must see a new application;

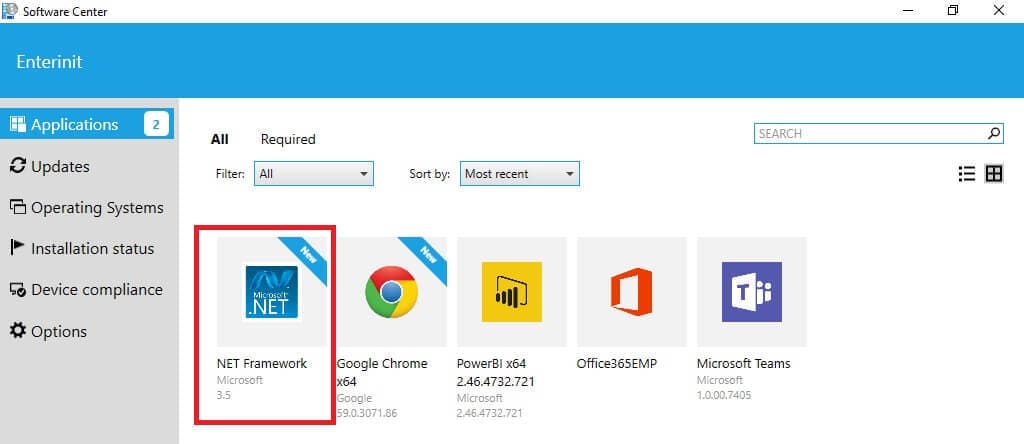
2. Klik Install and wait some time;

3. Client successfully installed it, so let’s uninstall it. Klik Uninstall;

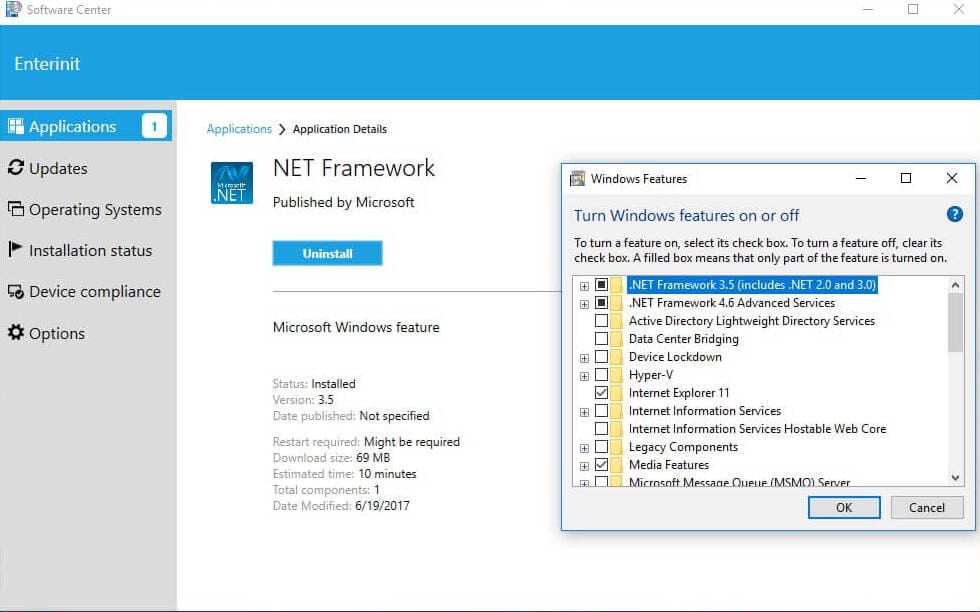
4. Uninstall completed and you can install it again if you wish;

TAGGET:SystemcenterSystem Center Configuration ManagerTeknisk forhåndsvisningWindowsWindows 10
Forrige artikel Download Java MSI x64 and x86 8.0.1410.15
Næste artikel Configuration Manager Forespørgselsindsamlingsliste SCCM 1702 KB4035759 Client update
10 Kommentarer 10 Kommentarer
  • Andrewjohnporter siger:
    January 16, 2018 på 6:38 kl

    Great post and thanks for the icon also unfortunately I an getting an error code 3 – file cannot be found.
    Doesn’t the installation program have to include the path to the .cab file so it knows where it is?
    dism /Online /Add-Package /PackagePath:%~dp0microsoft-windows-netfx3-ondemand-package

    Svar
  • Gerardo siger:
    July 9, 2020 på 2:43 kl

    hi, is this works on windows 10 1909

    Svar
    • Andrej Nadak siger:
      July 10, 2020 på 12:42 er

      Hi. This works with 1909 but you must use .Net3.5 cab file for windows 1909 (can be founded in 1909 iso).

      Svar
  • AVP.Riga siger:
    marts 16, 2021 på 7:28 er

    It doesn’t work on 1909+, installation progress looks fine, but after “Success” .NET 3.5 check mark in Windows Features is stay empty.

    Svar
    • Andrej Nadak siger:
      marts 16, 2021 på 7:39 er

      Are you use .Net distro from 1909+ build? It’s better to use the same build and language.

      Svar
  • Mark Dininio siger:
    marts 18, 2021 på 7:29 er

    Do you need internet access to Windows Update site for this to work or is this an offline install of .NET 3.5 Framework from the CAB file?

    Svar
    • Andrej Nadak siger:
      marts 19, 2021 på 11:04 er

      Hi, no, you don’t need internet access for this, you use distro from .cab file

      Svar
  • Martin siger:
    June 9, 2022 på 2:30 er
    Thank you for your post. Can you help me, please? I have the following problem:
    Installation program: microsoft-windows-netfx3-ondemand-package~31bf3856ad364e35~amd64~~.cab
    Installation start in: Dism.exe /online /enable-feature /featurename:NetFX3 /All /Source:"\\svr-mecm1.xxx.int\PackageSource\Aplications\Microsoft\NET Framework\3.5" /LimitAccess
    Uninstall program: DISM /online /disable-feature /FeatureName:NetFx3
    
    I can see the following alerts in AppEnforce.log:
    
    Failed in accessing working directory C:\WINDOWS\ccmcache\2r\Dism.exe /online /enable-feature /featurename:NetFX3 /All /Source:"\\svr-mecm1.xxx.int\PackageSource\Aplications\Microsoft\NET Framework\3.5" /LimitAccess, error 8007007b	AppEnforce	09.06.2022 11:20:48	6884 (0x1AE4)
    ScriptHandler::EnforceApp failed (0x8007007b).
    AppProvider::EnforceApp - Failed to invoke EnforceApp on Application handler(0x8007007b).
    CommenceEnforcement failed with error 0x8007007b.
    Method CommenceEnforcement failed with error code 8007007B
    ++++++ Failed to enforce app. Error 0x8007007b. ++++++
    
    I don't know what the problem is :(.


    Svar
    • Andrej Nadak siger:
      June 12, 2022 på 6:34 er

      Hi, check app deployment settings, especially “programs” tag “installation starts in” field

      Svar
  • Tim siger:
    January 9, 2023 på 7:19 er

    This worked for us, thanks! (Windows 10 v21H2)

    Svar

Efterlad et svar Annuller svar

Din e-mailadresse vil ikke blive offentliggjort. Påkrævede felter er markeret *

Denne side bruger Akismet til at reducere spam. Lær, hvordan dine kommentardata behandles.

Oversættelse

English中文(简体)DanskNederlandsFrançaisDeutschItaliano한국어PolskiPortuguêsRomânăEspañolУкраїнська
ved Transposh - translation plugin for wordpress

Populære indlæg

Systemkrav til Windows Server 2016
Windows Server
Configuration Manager Forespørgselsindsamlingsliste
Configmgr
Struktureret/administreret navigation aktiveret på moderne sider i klassiske teamwebsteder
Teknik
SCCM Kunne ikke hente DP-placeringer som den forventede version fra MP
Configmgr

Seneste indlæg

Installation og konfiguration af Fail2ban til SSH-beskyttelse på Ubuntu 24.04
Linux
Aktivering og konfiguration af FirewallD på AlmaLinux
Linux
Brugeroprettelse og SSH-nøgleopsætning i AlmaLinux
Linux
Sådan nulstiller du adgangskoden på AlmaLinux
Linux

© 2023 Enterine

Gå til mobil version
Velkommen tilbage!

Log ind på din konto

Brugernavn eller e-mail-adresse
Adgangskode

Mistet din adgangskode?