Ved at bruge denne side, du accepterer Privatlivspolitik.
Acceptere
EnterineEnterineEnterine
  • HJEM
  • Det pro
  • Teknik
  • Microsoft
    • Azurblå
    • Configmgr/SCCM
    • DPM
    • Orkester
    • Hyper-V
    • Microsoft Edge Insider
    • MSI
    • Kontor 365
    • Office Insider
    • Power BI
    • Skype
    • SQL Server
    • Hold
  • Windows
    • Windows Admin Center
    • Windows klient
    • Windows Server
  • SCCM-forespørgselsindsamlingsliste
Læsning: Step-by-Step Guide Configuration Manager Site Recovery
Font ResizerAa
EnterineEnterine
Font ResizerAa
  • HJEM
  • Det pro
  • Teknik
  • Microsoft
  • Windows
  • SCCM-forespørgselsindsamlingsliste
Søge
  • HJEM
  • Det pro
  • Teknik
  • Microsoft
    • Azurblå
    • Configmgr/SCCM
    • DPM
    • Orkester
    • Hyper-V
    • Microsoft Edge Insider
    • MSI
    • Kontor 365
    • Office Insider
    • Power BI
    • Skype
    • SQL Server
    • Hold
  • Windows
    • Windows Admin Center
    • Windows klient
    • Windows Server
  • SCCM-forespørgselsindsamlingsliste
Configmgr

Step-by-Step Guide Configuration Manager Site Recovery

Offentliggjort: februar 11, 2024
2 Min læst
DELE

Step-by-Step Guide Configuration Manager Site Recovery: Restoring Your Configuration Manager Infrastructure. In this post, we make the SCCM site recover. Sometimes you need to restore your SCCM, I show you how.

1. For the recovery process you must prepare the “SCCM server“, and “SQL server” and restore to SQL “SCCM Databases“. (NO DB, NO RECOVERY);

2. Start SCCM installation;

3. Click “Install“;

4. Click the “Next” button;

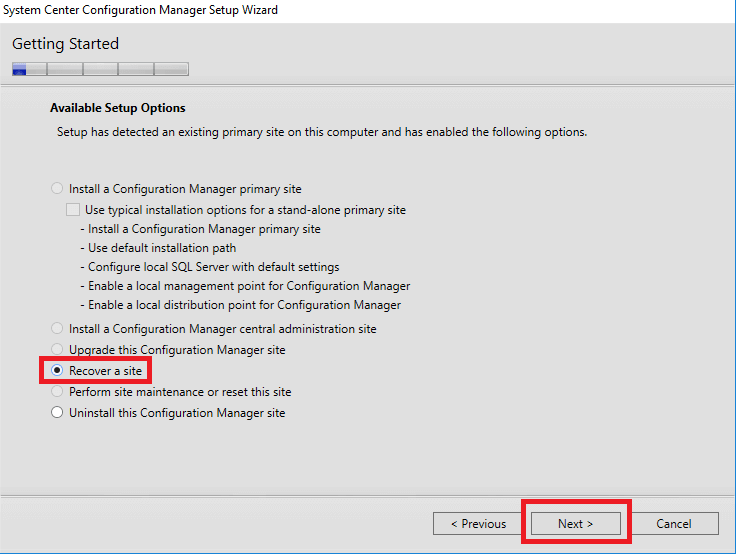
5. Select the option “Recover a site” and click the “Next” button;

6. Choose the best option for your situation, click the “Next” button (I choose “Use a site database that has been manually recovered“);

7. Click the “Next” button (if you don’t have an SCCM hierarchy);

8. Enter the license key or install the evaluation version, and click the “Next” button;

9. Read and accept “Licenses“, and click the “Next” button;

10. Download or use early downloaded “prerequisite files” (by clicking the “Next” button);

11. Check the information and click the “Next” button;

12. Enter “SQL server” and “SQL instance“, where you restore DBs;

13. Choose a location for data and logs, and click the “Next” button;

14. Click the “Next” button;

15. Check the “Summary” information and click the “Next” button;

16. After “Prerequisite check” click “Begin Install” to start recovering;

TAGGET:Microsoft SQL ServerMicrosoft Windows ServerSystemcenterSystem Center Configuration ManagerTeknisk forhåndsvisning
Forrige artikel How to Export Office 365 Mailboxes to PST from Admin Portal
Næste artikel Cluster size recommendations for ReFS and NTFS
Efterlad en kommentar Efterlad en kommentar

Efterlad et svar Annuller svar

Din e-mailadresse vil ikke blive offentliggjort. Påkrævede felter er markeret *

Denne side bruger Akismet til at reducere spam. Lær, hvordan dine kommentardata behandles.

Oversættelse

English中文(简体)DanskNederlandsFrançaisDeutschItaliano한국어PolskiPortuguêsRomânăEspañolУкраїнська
ved Transposh - translation plugin for wordpress

Populære indlæg

Systemkrav til Windows Server 2016
Windows Server
Configuration Manager Forespørgselsindsamlingsliste
Configmgr
Struktureret/administreret navigation aktiveret på moderne sider i klassiske teamwebsteder
Teknik
SCCM Kunne ikke hente DP-placeringer som den forventede version fra MP
Configmgr

Seneste indlæg

Installation og konfiguration af Fail2ban til SSH-beskyttelse på Ubuntu 24.04
Linux
Aktivering og konfiguration af FirewallD på AlmaLinux
Linux
Brugeroprettelse og SSH-nøgleopsætning i AlmaLinux
Linux
Sådan nulstiller du adgangskoden på AlmaLinux
Linux

© 2023 Enterine

Gå til mobil version
Velkommen tilbage!

Log ind på din konto

Brugernavn eller e-mail-adresse
Adgangskode

Mistet din adgangskode?