Al usar este sitio, estás de acuerdo con el política de privacidad.
Aceptar
EnterineEnterineEnterine
  • HOGAR
  • TI PRO
  • TECNOLOGÍA
  • Microsoft
    • Azur
    • Administrador de configuración/SCCM
    • Dpm
    • orquestador
    • Hiper-V
    • Información privilegiada de Microsoft Edge
    • MSI
    • Oficina 365
    • Información privilegiada de la oficina
    • Energía BI
    • Skype
    • Servidor SQL
    • equipos
  • VENTANAS
    • Centro de administración de Windows
    • Cliente de Windows
    • Servidor Windows
  • Lista de recopilación de consultas SCCM
Lectura: Configuration Manager How to Install and Configure Distribution Point
Cambiar tamaño de fuenteAutomóvil club británico
EnterineEnterine
Cambiar tamaño de fuenteAutomóvil club británico
  • HOGAR
  • TI PRO
  • TECNOLOGÍA
  • Microsoft
  • VENTANAS
  • Lista de recopilación de consultas SCCM
Buscar
  • HOGAR
  • TI PRO
  • TECNOLOGÍA
  • Microsoft
    • Azur
    • Administrador de configuración/SCCM
    • Dpm
    • orquestador
    • Hiper-V
    • Información privilegiada de Microsoft Edge
    • MSI
    • Oficina 365
    • Información privilegiada de la oficina
    • Energía BI
    • Skype
    • Servidor SQL
    • equipos
  • VENTANAS
    • Centro de administración de Windows
    • Cliente de Windows
    • Servidor Windows
  • Lista de recopilación de consultas SCCM
ConfigMgr

Configuration Manager How to Install and Configure Distribution Point

Publicado: Febrero 11, 2024
3 Lectura mínima
COMPARTIR

Configuration Manager How to Install and Configure Distribution Point: Guía paso a paso.

Contenido
Install Distribution PointConfigure the Network Access Account

Install Distribution Point

1. Open your SCCM Console. Ir a Administration\Overview\Site Configuration\Servers and Site System Roles;

2. Select your target server, select Distribution Point, and click Properties in the upper menu (o Botón derecho del ratón y haga clic Propiedades);

3. For the General pestaña. si usas Http don’t forget to enable the checkmark Permitir que los clientes se conecten de forma anónima (or you get errors at OSD deployments); Elija la opción Import certificate, select your Certificado, and enter Contraseña;
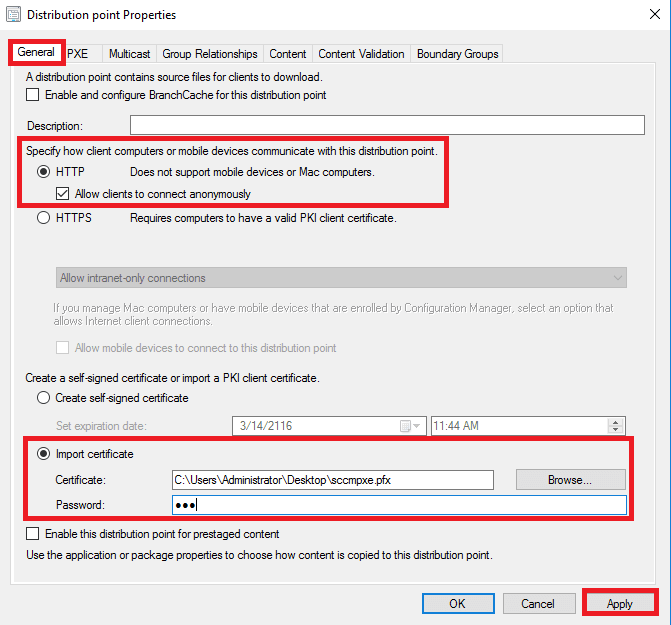
4. Hacer clic Aplicar y ir a the PXE pestaña.

5. Para el PXE tab. Enable check mark Enable PXE supports for clients when getting message click Sí (remember this message text, it may help you).
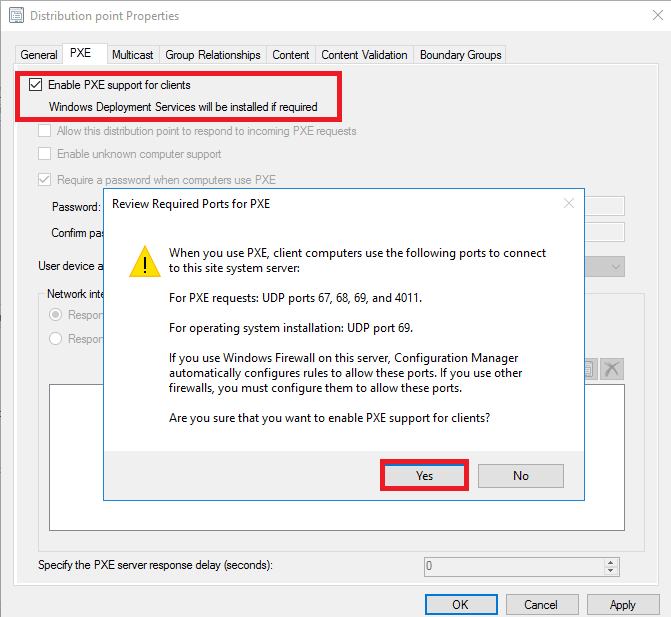
6. Enable check mark Allow this distribution point to respond to incoming PXE requests. Enable check mark Enable unknown computer support y haga clic DE ACUERDO in the pop-up window;

7. If you have several network interfaces, you may choose who responds to PXE. También, you may set PXE response delay if you need;

8. Hacer clic Aplicar and go to the Multicast pestaña.

9. For the Multicast pestaña. Enable check mark Enable multicast to simultaneously send data to multiple clients;

10. Go to the Content Validation pestaña.

11. For the Content Validation pestaña. Enable check mark Validate content on a schedule;

12. Haga clic en el botón Schedule and make configuration, when complete click DE ACUERDO;

13. Ir a Grupos de límites, if you already config groups for this DP you will see it here. Hacer clic DE ACUERDO;

14. After some time if you open Administrador del servidor you will notice, that the WDS role added;

Configure the Network Access Account

1. Open SCCM Console. Ir a Administration\Overview\Site Configuration\Sites. Select your site. Click in upper menu Settings\Configure Site Components\Software Distribution;

2. Ir a el Network Access Account tab, select the option Specify the account that access network locations;

3. Click on the “sun” button and choose New Account;

4. Enter your service account User name (also may click Navegar and select an account from Active Directory), Contraseña y Confirm Password, hacer clic Verify;

5. Enter the path to a network share on the SCCM server (also may click Browse and select folder)y haga clic Test connection. In the pop-up window click DE ACUERDO.

6. Hacer clic DE ACUERDO to close the Windows User Account ventana;

7. Account added, hacer clic DE ACUERDO;

ETIQUETADO:Servidor Microsoft WindowsCentro del sistemaAdministrador de configuración de System Center
Artículo anterior SCCM extend Active Directory Schema app
Artículo siguiente SCOM free Squared Up Community Edition license
Deja un comentario Deja un comentario

Deja una respuesta Cancelar respuesta

Su dirección de correo electrónico no será publicada. Los campos obligatorios están marcados *

Este sitio utiliza Akismet para reducir el spam.. Descubra cómo se procesan los datos de sus comentarios.

Traducción

English中文(简体)DanskNederlandsFrançaisDeutschItaliano한국어PolskiPortuguêsRomânăEspañolУкраїнська
por Transposh - Plugin de traducción para WordPress

Publicaciones populares

Requisitos del sistema para Windows Server 2016
Servidor Windows
Lista de recopilación de consultas del Administrador de configuración
ConfigMgr
Navegación estructurada/administrada habilitada en páginas modernas en sitios de equipo clásicos
Técnico
SCCM no pudo obtener las ubicaciones de DP como la versión esperada de MP
ConfigMgr

Publicaciones recientes

Instalación y configuración de Fail2ban para protección SSH en Ubuntu 24.04
linux
Cómo verificar la zona horaria en Linux
linux
Habilitación y configuración de FirewallD en AlmaLinux
linux
Creación de usuarios y configuración de claves SSH en AlmaLinux
linux

© 2023 Enterine

Ir a la versión móvil
Bienvenido de nuevo!

Inicia sesión en tu cuenta

Nombre de usuario o dirección de correo electrónico
Contraseña

Perdiste tu contraseña?