
Complete Guide to Install Active Directory on Windows Server 2016 | Step-by-Step Configuration. This post provides a full Guide to the installation and configuration of the Windows Server 2016 Active Directory Role. Installation and Configuration are similar to Windows poslužitelj 2012 R2.
Some preparation:
- Create a strong password for the Administrator account (it will be Domain Admin in the future);
- Install all updates;
- Rename your server with a Corporate naming policy. (When you install Windows Server, a random name is generated);
- Assign a static IP to your server.
Installation
1. After Server Manager starts – click on Add roles and features link;
2. Klik the Next button on the wizard screen. Također, you may set a check mark Skip this page by default and you don’t see this step at the next runtime;
3. For installation type, Izaberi Role-based or feature-based installation i kliknite the Next dugme;
4. Choose the option Select a server from the server pool (selected by default) i kliknite na Sljedeći dugme;
5. Click the checkbox for Active Directory Domain Services;
6. In the new pop-up window click Add Features;
7. Klik the Next dugme;
8. For Features, don’t select anything, klik the Next dugme;
9. For Active Directory Domain Services click the Next dugme;
10. At the confirmation screen, you may decide whether to restart the destination server automatically or not, u mom slučaju, I don’t set this option. Klik the Install dugme;
11. Installation begins;
12. Once completed, kliknite na Zatvoriti dugme.
Configuration
1. From the Server Manager dashboard, click the flag with the exclamation mark symbol. Klik Promote the server to a domain controller;

2. On the next screen, select the deployment operation that is needed. In this example, the Add a new forest is selected and the name enterinit.com is entered to create a new root domain. Klik Sljedeći dugme;
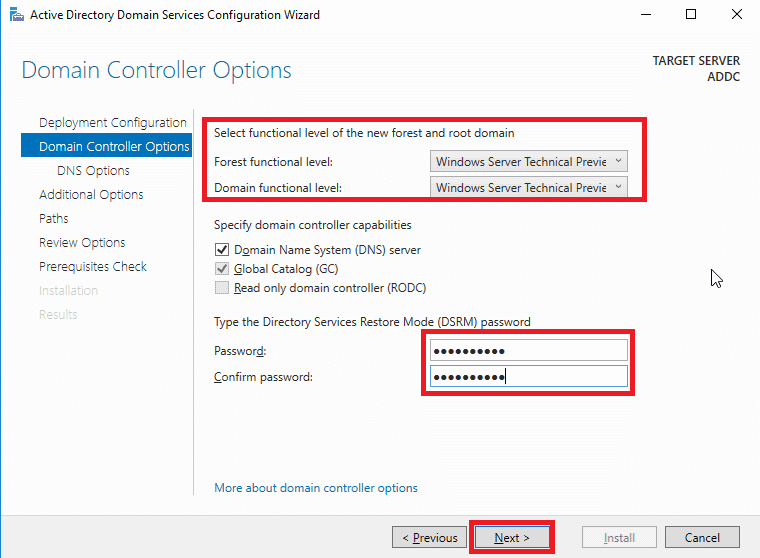
3. Since this will be the only domain controller in this lab example, both the forest and domain functional levels will remain at Windows Server Technical Preview (I use Windows Server 2016 from VLSC, but is recognized as Technical Preview). Leave a checkbox on the Domain Name System (DNS) poslužitelj to make this system a DNS server. The option for GC is checked without the ability to modify since the first domain controller must be a Global Catalog poslužitelj. The third option is unchecked and unmodifiable because the first domain controller cannot be a Read-Only Domain Controller;
4. Enter a DSRM password and click Sljedeći;
5. For DNS options, there is no existing DNS infrastructure since this is our first domain controller. Tako, the warning can be ignored. Klik the Next dugme;
6. Unesi the BIOS domain name and click the Sljedeći dugme;
7. If you need you may change folders locations (NOT RECOMMENDED), kliknite na Sljedeći dugme;
8. Review options. Please note that a PowerShell shell script is provided if you need to automate this on future installs. Klik View Script. If needed, copy this script for future use. Close the Notepad window and click the Sljedeći dugme;
9. System check prerequisites;
10. If the prerequisites check passes, then click the Install dugme;

11. The installation will begin;
12. Once complete – the system will be rebooted;
13. After reboot you may sign into PC as Domain Admin;
14. This is the result of our Windows Server 2016 Active Directory installation;


