Configuration Manager How to Install and Configure Distribution Point: Step-by-Step Guide.
Install Distribution Point
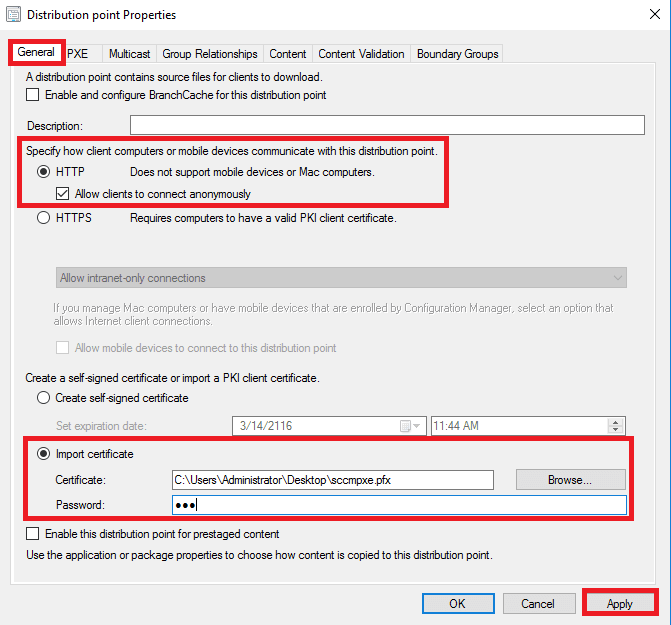
1. Open your SCCM Console. 가십시오 Administration\Overview\Site Configuration\Servers and Site System Roles;
2. Select your target server, select Distribution Point, and click Properties in the upper menu (or 마우스 오른쪽 버튼 그리고 클릭 Properties);
3. For the General tab. 사용하는 경우 HTTP don’t forget to enable the checkmark Allow clients to connect anonymously (or you get errors at OSD deployments); Choose the option Import certificate, select your Certificate, 그리고 입장하십시오 비밀번호;

4. Click 적용하다 and go to the PXE tab.
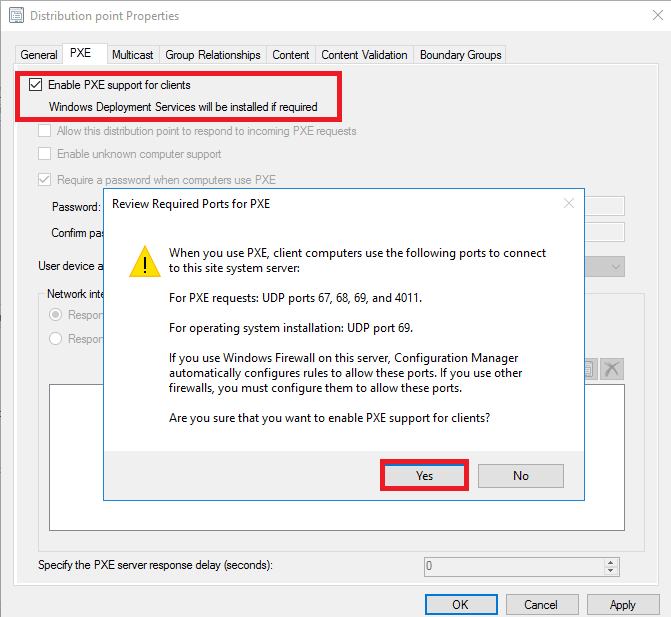
5. 을 위한 그만큼 PXE tab. Enable check mark Enable PXE supports for clients when getting message click 예 (remember this message text, it may help you).

6. Enable check mark Allow this distribution point to respond to incoming PXE requests. Enable check mark Enable unknown computer support 그리고 클릭 좋아요 in the pop-up window;
7. If you have several network interfaces, you may choose who responds to PXE. 또한, you may set PXE response delay if you need;
8. Click 적용하다 and go to the Multicast tab.
9. For the Multicast tab. Enable check mark Enable multicast to simultaneously send data to multiple clients;
10. Go to the Content Validation tab.
11. For the Content Validation tab. Enable check mark Validate content on a schedule;
12. Click the button Schedule and make configuration, when complete click 좋아요;
13. 가십시오 Boundary Groups, if you already config groups for this DP you will see it here. Click 좋아요;
14. After some time if you open Server Manager you will notice, that the WDS role added;
Configure the Network Access Account
1. Open SCCM Console. 가십시오 Administration\Overview\Site Configuration\Sites. Select your site. Click in upper menu Settings\Configure Site Components\Software Distribution;
2. 가십시오 그만큼 Network Access Account tab, select the option Specify the account that access network locations;
3. Click on the “sun” button and choose New Account;
4. Enter your service account User name (also may click Browse and select an account from Active Directory), 비밀번호 그리고 Confirm Password, click Verify;
5. Enter the path to a network share on the SCCM server (also may click Browse and select folder)그리고 클릭 Test connection. In the pop-up window click 좋아요.
6. Click 좋아요 to close the Windows User Account window;
7. Account added, click 좋아요;


