이 사이트를 이용함으로써, 당신은 다음에 동의합니다 개인 정보 보호 정책.
수용하다
엔터인IT엔터인IT엔터인IT
  • 집
  • IT 프로
  • 기술
  • 마이크로 소프트
    • 하늘빛
    • 구성 관리자/SCCM
    • DPM
    • 오케스트레이터
    • Hyper-V
    • 마이크로소프트 엣지 인사이더
    • MSI
    • 사무실 365
    • 사무실 내부자
    • 파워 BI
    • 스카이프
    • SQL 서버
    • 팀
  • 창
    • Windows 관리 센터
    • 윈도우 클라이언트
    • 윈도우 서버
  • SCCM 쿼리 컬렉션 목록
독서: How to Install DNS Role on Windows Server 2016
글꼴 크기 조정기아아
엔터인IT엔터인IT
글꼴 크기 조정기아아
  • 집
  • IT 프로
  • 기술
  • 마이크로 소프트
  • 창
  • SCCM 쿼리 컬렉션 목록
찾다
  • 집
  • IT 프로
  • 기술
  • 마이크로 소프트
    • 하늘빛
    • 구성 관리자/SCCM
    • DPM
    • 오케스트레이터
    • Hyper-V
    • 마이크로소프트 엣지 인사이더
    • MSI
    • 사무실 365
    • 사무실 내부자
    • 파워 BI
    • 스카이프
    • SQL 서버
    • 팀
  • 창
    • Windows 관리 센터
    • 윈도우 클라이언트
    • 윈도우 서버
  • SCCM 쿼리 컬렉션 목록
윈도우 서버

How to Install DNS Role on Windows Server 2016

게시: 2월 4, 2024
2 최소 읽기
공유하다

How to Install DNS Role on Windows Server 2016. Continuing preparing System Center LAB. In this post, we install Domain Name System (DNS) role in our future Domain Controller “DCSC” (early created VM “DCSCCM” that I renamed) “Virtual machine” (VM) with Microsoft Windows Server 2016 Standard.

1. For role installation I use the Server Manager console. By default, it starts automatically at logon. If the console doesn’t open, you may start in manually. Left Mouse Button click the Start button and then click “Server Manager” or use search;

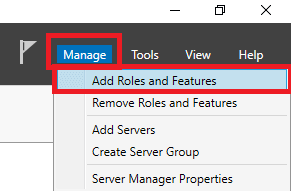
2. When the console opened click Manage (upper menu) and select from the list Add Roles and Features;
3. In a new window read the text and, if it’s all in a good state, click the Next button;

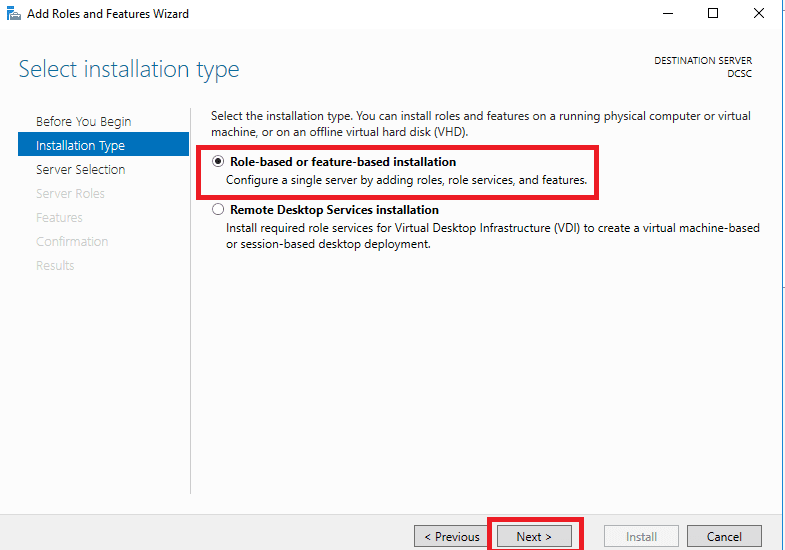
4. Select (selected by Default) “Role-based or feature-based installation” and click the Next button;
5. Select the target server or (if it’s only one) click the Next button;

6. Set check mark at “DNS Server“;

7. In pop-up windows click the Add Features button (DNS Tools for management DNS role);

8. After that click the Next button;

9. Now we don’t install any feature, so click the Next button;

10. Read short information about DNS and click the “Next” button;

11. If you wish, you may set the check mark at “Restart the destination server automatically if required” (by standard deployment there is no restart) and click “설치하다“;

12. All good, installation start;

13. After installation is complete click the “Close” button. On the left side of the Server Manager console you will see the new option “DNS“;

winsrv2016dns13
태그됨:액티브 디렉토리Microsoft Windows 서버창윈도우 서버 2016
이전 기사 How to Join Windows 10 to a Domain: Step-by-Step Guide
다음 기사 Hyper-V Virtual Disk Operations: Compact, Convert, Expand, and Shrink – How to Guide and Tips
코멘트를 남겨주세요 코멘트를 남겨주세요

답장을 남겨주세요 답장 취소

귀하의 이메일 주소는 공개되지 않습니다. 필수 입력란이 표시되어 있습니다 *

이 사이트는 스팸을 줄이기 위해 Akismet을 사용합니다.. 댓글 데이터가 처리되는 방법 알아보기.

번역

English中文(简体)DanskNederlandsFrançaisDeutschItaliano한국어PolskiPortuguêsRomânăEspañolУкраїнська
~에 의해 Transposh - translation plugin for wordpress

인기 게시물

Windows Server의 시스템 요구 사항 2016
윈도우 서버
구성 관리자 쿼리 컬렉션 목록
구성 관리자 쿼리 컬렉션 목록
configmgr
클래식 팀 사이트의 최신 페이지에서 구조적/관리형 탐색 활성화
기술
SCCM이 DP 위치를 MP에서 예상 버전으로 가져오지 못했습니다.
configmgr

최근 게시물

Ubuntu에서 SSH 보호를 위한 Fail2ban 설치 및 구성 24.04
리눅스
AlmaLinux에서 FirewallD 활성화 및 구성
리눅스
AlmaLinux에서 사용자 생성 및 SSH 키 설정
리눅스
AlmaLinux에서 비밀번호를 재설정하는 방법
리눅스

© 2023 엔터인IT

모바일 버전으로 이동하십시오
돌아온 것을 환영합니다!

귀하의 계정에 로그인하세요

사용자 이름 또는 이메일 주소
비밀번호

비밀번호를 잃어버렸습니다?