Preparación de la instalación de SQL Server: Crear reglas de firewall de Windows, Discos lógicos, Instalación de .NET Framework 3.5, y creación de cuentas de servicio.
Create Windows Firewall rules for SQL
1. Log in to your SQL server. Botón derecho del mouse clickea en el Comenzar botón y seleccione Panel de control;
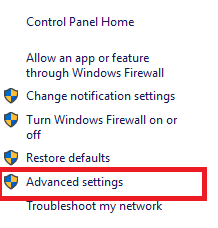
2. Abierto firewall de Windows;
3. Haga clic en Advanced settings;
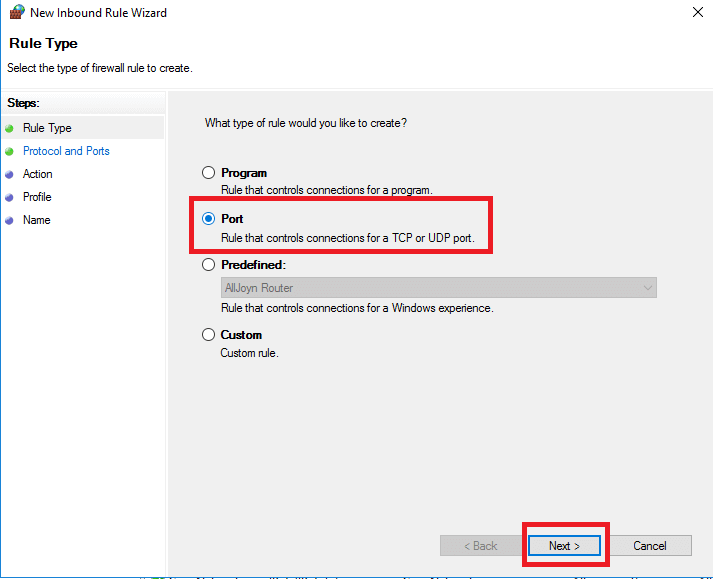
4. Haga clic en Reglas de entrada y seleccione Nueva regla;
5. Select the option Puerto y haga clic en el Próximo botón;
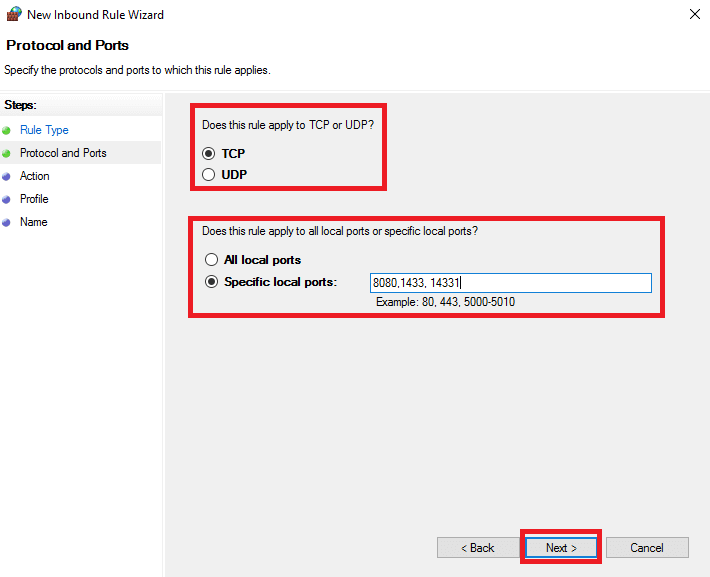
6. Select options UDP, Specific local ports y entrar 1434 y haga clic en el Próximo botón. (Default SQL UDP port, allow remote connections to SQL);

7. Leave Permitir la conexión y haga clic en el Próximo botón;

8. Leave check marks by default and click Próximo;

9. Enter the rule name, for an example SQL UDP, y haga clic en el Finalizar botón;
10. Repeat and select the TCP opción, Specific local ports, y entrar 1433. (Default SQL TCP port). También, I enter 14331 y 8080 after the symbol “,” for my future SCCM installation. Hacer clic el Próximo botón;
11. Repeat, enter the rule name, Por ejemplo, SQL TCP, y haga clic en el Finalizar botón;
12. Check created tules;
Create logical disks
Create logical disks. Early I create y connect to my SQL VM two “Virtual Disks“. En esta publicación, we initialize them and create “Logical disks” in the system.
1. Botón derecho del mouse on the “Comenzar” button and select “Gestión de discos“;

2. First of all change the “CD-ROM” drive letter from “D" a "R“. Botón derecho del mouse click on CD-ROM and select Change Drive Letter and Paths;

3. Haga clic en el Cambiar botón;
4. Select the drive letter “R” and click the DE ACUERDO botón;

5. In the pop-up window click the Sí botón;
6. Haga clic en el DE ACUERDO button to apply changes;
7. Botón derecho del mouse click on the first Disk and select En línea;

8. Botón derecho del mouse click on the first Disk and select initialize Disk;

9. Select option “GPT (GUID Partition Table)" y haga clic en "DE ACUERDO" botón;
10. Botón derecho del mouse click on first Disk “Unallocated space” and select “New Simple Volume” (to create new logical disk);

11. Haga clic en el "Próximo" botón;
12. Leave size as default and click the “Próximo" botón;
13. Assign a drive letter, as an example “D" y haga clic en "Próximo" botón;
14. Set format options:
- Sistema de archivos – leave “NTFS“, if you use “ReFS” – you can’t backup it with “DPM” (Data Protection Manager doesn’t understand ReFS);
- Allocation unit size – I set “64k” because I place on disk a few big files;
- Volume label – set the name for your drive. In my case “SCCM-DATA“.
Haga clic en el "Próximo" botón;

15. Check the summary information and click the “Finalizar" botón;
16. Repeat for the second disk;
17. Open “This PC” and check newly added “Logical Disks”;
Install Net Framework 3.5
You can install it using CMD or GUI. En esta publicación, we install “NET Framework 3.5” from GUI.
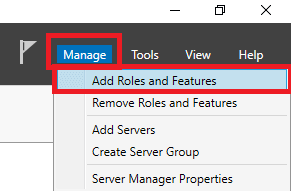
1. If Server Manager doesn’t start at login – run it. Click on the upper menu “Manage” and select “Add Roles and Features”;
2. Haga clic en el "Próximo" botón;
3. Haga clic en el "Próximo" botón;
4. Select your target server and click the “Próximo" botón;
5. Don’t install any roles, haga clic en el "Próximo" botón;
6. Set the check mark on “.NET Framework 3.5 Features” and click the “Próximo" botón;

7. Haga clic en el "Instalar" botón (if you don’t have an internet connection, but insert DVD or *.iso file with operating system installation files – click “Specify an alternate source path” <letra de unidad>:\fuentessxs);
8. When the installation is complete click the “Cerca" botón;
Create Service Accounts
1. For my SQL & SCCM deployment I create folders:
- On disk “D” (“SCCM-DATA“) – SCCM and sub-folders (Backup, Datos, Registros);
- On disk “mi” (“TEMP“) – SCCM;
You plan and deploy SQL as you wish or by your “Corporate Policies“.
2. Let’s add “cuentas de servicio” for SQL and SCCM deployment. Botón derecho del mouse click on the “Comenzar” button and select “Computer Management”;

3. Ir a "Grupos” and open “Administradores“;

4. Haga clic en el "Agregar" botón;
5. First add the SCCM server (“AD Object Computer“) cuenta. Próximo, add all SQL service accounts and SCCM service accounts (for client installation); After adding click thmi “DE ACUERDO" botón;
6. Also you may enable in “firewall de Windows” rule to allow ping;

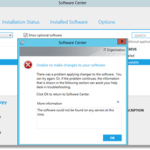
7. And enable more rules (ver captura de pantalla) for successful SCCM deployment.

8. If you don’t do step “7” you may get the next error when installing SCCM;