
Operacije virtualnog diska Hyper-V: Kompaktan, Pretvoriti, Proširiti, i Smanji – Kako voditi i savjeti.
Kompaktan
1. Run your Hyper-V upravitelj and click on Edit Disk;

2. Klik Sljedeći;
3. Kliknite na pretraživati to select your disk for operations;
4. After Disk is selected click Sljedeći;

5. First option is Kompaktan (this is the simplest operation). Klik Sljedeći;

6. At the next page click Sljedeći;
Pretvoriti
1. Option Pretvoriti (change your Virtual Disk format, *.vhd or *.vhdx). Klik Sljedeći;

2. Select the format and click Sljedeći;

3. Select the type of Virtual Disk.
BILJEŠKA: In enterprise is Best Practice – to use a Virtual Disk type Fixed size.
4. Make a choice and click Sljedeći;

5. Kliknite na pretraživati to select the final name and destination of Virtual Disk, i kliknite Save;
7. If it’s ok – click Sljedeći;
8. Klik Završi to run this operation;
Proširiti
1. Run Hyper-V Manager and click on Inspect Disk and select target Virtual Disk to show information about it. Kliknite na Zatvoriti dugme;
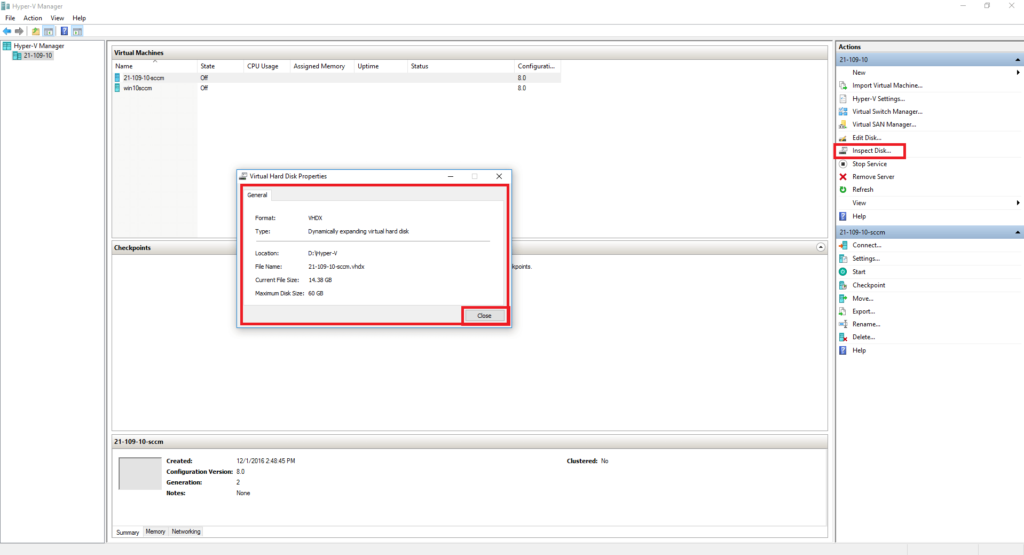
2. We have 60 GB VHDX, Expand it. Click on Edit Disk in Hyper-V Manager; Kliknite na Sljedeći dugme;
3. Klik the Browse button and select target Virtual Disk;
4. After selecting click the Sljedeći dugme;

5. Izaberi Proširiti option and click the Sljedeći dugme;

6. Enter the new size and click the Next button, I’m set to 80 GB. (You must have free space to do this);

7. Check the final information and click the Završi dugme;
8. Let’s Inspect Disk again. As we see – it now 80 GB size.

9. Connect to VM, which Virtual Disk we Proširiti. Login in (user must have Local Administrator Rights) and open This PC;
10. As we see it’s 60 GB (old size) but not 80 GB. Zatvoriti This PC. Desna tipka miša kliknite na the Start button and select Disk Management;

11. After the Disk Management console opens you will see Unallocated space on the Disk (20 GB);

12. Desna tipka miša click on Disk “(C:)” and select Extend Volume;

13. Kliknite na Sljedeći dugme;

14. It shows up space for extending. Kliknite na Sljedeći dugme;

15. Klik Završi to apply changes;

16. As we see – The disk is extended to 80 GB, close the Disk Management konzola;

17. Open “This PC again. Hooray “Local Disk (C:)” now has an 80 GB size.

Shrink
1. Run Hyper-V Manager and make sure your Virtualni stroj (VM) with target “Virtual Disk is in an Off state. Close Hyper-V Manager;

2. Otvoren Disk Management on the Hyper-V computer (local pc). Desna tipka miša kliknite na the Start button and select Disk Management;

3. After the Disk Management console opens, go to the upper menu. Klik Action and then Attach VHD;

4. Klik pretraživati to select the target Virtual Disk datoteka;

5. After selecting click the u redu dugme;

6. We connected Virtual Disk;

7. Desna tipka miša click on the connected Disk and select Shrink Volume;

8. Enter the size in MB (Megabytes) to shrink from Disk. Kliknite na Shrink dugme;

9. Perfect, shrinking is successful;

10. Desna tipka miša click on your Virtual Disk i odaberite Detach VHD;

11. Klik u redu and close the Disk Management konzola;

12. Run your Hyper-V Manager and click on Edit Disk;

13. Kliknite na Sljedeći dugme;

14. Kliknite na pretraživati button to select target Virtual Disk;

15. After selecting Disk click the Sljedeći dugme;

16. As you see we get a new option Shrink, select it and click the Sljedeći dugme;
BILJEŠKA: Option “Shrink” is available if “Virtual Disk” has “Unallocated” space.

17. Enter the new size and click the Završi dugme;

18. Inspect our Virtual Disk again, now it’s 41 GB;

19. In the system;


