Prin utilizarea acestui site, sunteți de acord cu Politica de confidențialitate.
Accepta
EnterinITEnterinITEnterinIT
  • ACASĂ
  • IT PRO
  • TECH
  • MICROSOFT
    • Azur
    • ConfigMgr/SCCM
    • DPM
    • Orchestrator
    • Hyper-V
    • Microsoft Edge Insider
    • MSI
    • Birou 365
    • Office Insider
    • Power BI
    • Skype
    • SQL Server
    • Echipe
  • WINDOWS
    • Centrul de administrare Windows
    • Client Windows
    • Windows Server
  • Lista de colecție de interogări SCCM
Lectură: How to Install .Net Framework 3.5 Offline in Windows 10 and Windows Server
Redimensionare fontAa
EnterinITEnterinIT
Redimensionare fontAa
  • ACASĂ
  • IT PRO
  • TECH
  • MICROSOFT
  • WINDOWS
  • Lista de colecție de interogări SCCM
Căutare
  • ACASĂ
  • IT PRO
  • TECH
  • MICROSOFT
    • Azur
    • ConfigMgr/SCCM
    • DPM
    • Orchestrator
    • Hyper-V
    • Microsoft Edge Insider
    • MSI
    • Birou 365
    • Office Insider
    • Power BI
    • Skype
    • SQL Server
    • Echipe
  • WINDOWS
    • Centrul de administrare Windows
    • Client Windows
    • Windows Server
  • Lista de colecție de interogări SCCM
Client Windows

How to Install .Net Framework 3.5 Offline in Windows 10 and Windows Server

Publicat noiembrie 27, 2024
1 Min Read
SHARE

How to Install .Net Framework 3.5 Offline in Windows 10 and Windows Server. Very often we need NET Framework 3.5 component in our system. By default, it’s disabled. The best choice to install it in Windows or Windows Server is to use Prompt de comandă (CMD). For this operation, you need .iso windows distributive mounted in the system or Windows disk in CD-ROM, or folder “X:\sources\sxs” copied to the local disk.

How-to Install .Net Framework 3.5 offline

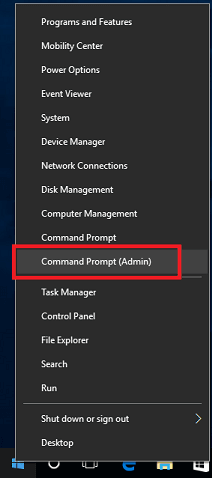
1. Start Command Prompt with admin rights. For doing this – Butonul din dreapta al mouse-ului click on the Start button and select Prompt de comandă (Admin):

2. In the opened windows insert the text string and press Intră:

dism.exe /Online /Enable-Feature /FeatureName:NetFx3 /All /Source:D:\sources\sxs /LimitAccess
PowerShell

Where D: is your installation media.

3. When the installation is finished – close Command Prompt:

NOTE: Better use windows distributive like your installation (Windows 10 1607 – windows 10 1607, Windows 8 – Windows 8 … )

Etichetat:Prompt de comandă (CMD)WindowsWindows 10
Articolul precedent How to Create a Virtual Machine in Windows 10 using Hyper-V Manager, PowerShell, and Quick Create
Articolul următor Prepare for Active Directory and DNS roles installation in Windows Server 2016
Lasă un comentariu Lasă un comentariu

Lasă un răspuns Anulează răspunsul

Adresa ta de e-mail nu va fi publicată. Câmpurile obligatorii sunt marcate *

Acest site folosește Akismet pentru a reduce spamul. Aflați cum sunt procesate datele comentariilor dvs.

Traducere

English中文(简体)DanskNederlandsFrançaisDeutschItaliano한국어PolskiPortuguêsRomânăEspañolУкраїнська
 Editați traducerea
de Transposh - translation plugin for wordpress

Postări populare

Cerințe de sistem pentru Windows Server 2016
Windows Server
Lista de colecție de interogări din Configuration Manager
ConfigMgr
Navigarea structurată/gestionată este activată în paginile moderne din site-urile clasice ale echipelor
Teh
SCCM nu s-a obținut locațiile DP ca versiune așteptată de la MP
ConfigMgr

Postări recente

Instalarea și configurarea Fail2ban pentru protecție SSH pe Ubuntu 24.04
Linux
Activarea și configurarea FirewallD pe AlmaLinux
Linux
Crearea utilizatorilor și configurarea cheii SSH în AlmaLinux
Linux
Cum să resetați parola pe AlmaLinux
Linux

© 2023 EnterinIT

Accesați versiunea mobilă
adbanner
Bine ai revenit!

Conectați-vă la contul dvs

Nume de utilizator sau adresă de e-mail
Parolă

Ți-ai pierdut parola?