
How to Fix Large File Upload Error 404 on IIS | Adım adım rehber. The following error occurs when uploading large files to the website.
Server Error
404 – File or directory not found.
The resource you are looking for might have been removed, had its name changed, or is temporarily unavailable.
To enable uploading large files you have to change a setting in IIS.
NOT: The limit is approximately 28,6 MB because the limit of maxAllowedContent Length dır-dir 30000000 bayt.
To change the maximum upload setting, named “maxAllowedContent Length”, aşağıdakileri yapın:
1. Log on to the server that holds the IIS website, ve ardından tıklayınBaşlangıç, tıklamakPrograms, tıklamakAdministrative Tools, tıklamakinternet bilgi servisi (IIS) Müdür;
2. Expand the website that you want to increase the maxAllowedContent Length;
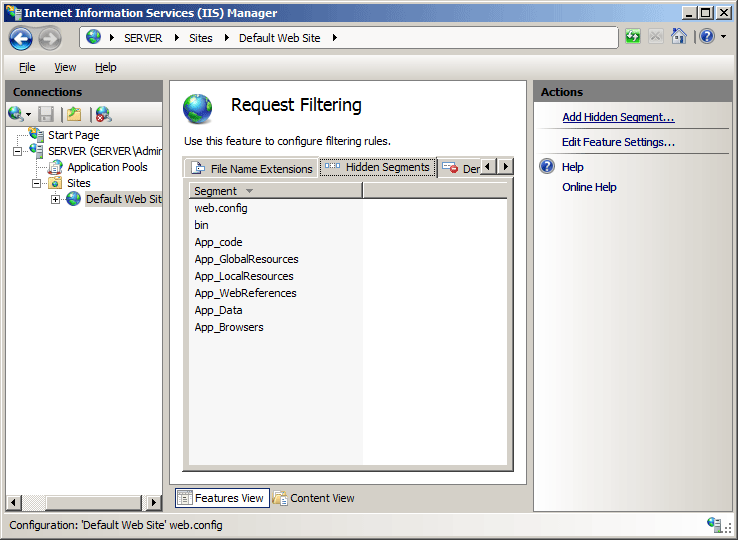
3. Double-click theRequest Filtering icon in the main window
NOT: if you don’t have the Request Filtering icon, you need to install it through theAdd Roles seçenek. Get the instructions below.
4. TıklaHidden SegmentTab;
5. Sağ tık web.config ve tıklayınEdit Feature Setting;
6. A new window namedEdit Request Filtering Settings görünür;
7. AltındaRequest Limitsbaşlık. enter a new larger value in theMaximum allowed content length (Bytes) box;
8. TıklamakTAMAM to apply the change.
Setup Request Filtering
The default installation of IIS 7 and later includes the Request Filtering role service or feature. If the Request Filtering role service or feature is uninstalled, you can reinstall it using the following steps.
Windows Server 2012 R2
1. On the taskbar, tıklamak Sunucu Yöneticisi.
2. İçinde Sunucu Yöneticisi, tıkla Üstesinden gelmek menu and then click Rolleri ve Özellikleri Ekleyin.
3. İçinde Rolleri ve Özellikleri Ekleyin wizard, tıklamak Sonraki. Select the installation type and click Sonraki. Select the destination server and click Sonraki.
4. Üzerinde Sunucu Rolleri sayfa, genişletmek Web sunucusu (IIS), genişletmek Web sunucusu, genişletmek Güvenlik, ve sonra seçin Request Filtering. Tıklamak Sonraki.

5. Üzerinde Select features sayfa, tıklamak Sonraki.
6. Üzerinde Confirm installation selections sayfa, tıklamak Düzenlemek.
7. Üzerinde Sonuçlar sayfa, tıklamak Kapalı.
How To
Note for IIS 7.0 kullanıcılar: Some of the steps in this section may require that you install the Microsoft Administration Pack for IIS 7.0, which includes a user interface for request filtering. To install the Microsoft Administration Pack for IIS 7.0, please see the following URL iis.net/expand/AdministrationPack
How to add a hidden segment
- Açık internet bilgi servisi (IIS) Müdür:
- If you are using Windows Server 2012 or Windows Server 2012 R2:
- On the taskbar, tıklamak Sunucu Yöneticisi, tıklamak Aletler, ve ardından tıklayın internet bilgi servisi (IIS) Müdür.
- If you are using Windows 8 or Windows 8.1:
- Hold down the pencereler anahtar, press the letter X, ve ardından tıklayın Kontrol Paneli.
- Tıklamak Administrative Tools, and then double-click internet bilgi servisi (IIS) Müdür.
- If you are using Windows Server 2008 or Windows Server 2008 R2:
- On the taskbar, tıklamak Başlangıç, point to Administrative Tools, ve ardından tıklayın internet bilgi servisi (IIS) Müdür.
- If you are using Windows Vista or Windows 7:
- On the taskbar, tıklamak Başlangıç, ve ardından tıklayın Kontrol Paneli.
- Double-click Administrative Tools, and then double-click internet bilgi servisi (IIS) Müdür.
- If you are using Windows Server 2012 or Windows Server 2012 R2:
- İçinde Connections pane, go to the connection, alan, application, or directory for which you want to modify your request filtering settings.
- İçinde Ev pane, double-click Request Filtering.
- İçinde Request Filtering pane, tıkla Hidden Segments sekme, ve ardından tıklayın Add Hidden Segment… içinde Hareketler pane.
- İçinde Add Hidden Segment iletişim kutusu, enter the relative path that you want to hide, ve ardından tıklayın TAMAM.


