Windows服务器 2016 DHCP Role Installation with GUI and PowerShell: 分步指南.
Dynamic Host Configuration Protocol (动态主机配置协议) is a client/server protocol that automatically provides an Internet Protocol (IP) host with its IP address and other related configuration information such as the subnet mask and default gateway. RFCs 2131 和 2132 define DHCP as an Internet Engineering Task Force (IETF) standard based on Bootstrap Protocol (BOOTP), a protocol with which DHCP shares many implementation details. DHCP allows hosts to obtain required TCP/IP configuration information from a DHCP server.
带图形用户界面:
1. Start your system, when 服务器管理器 opens click Add roles and features;
2. 为了 Installation Type, 点击 下一个;
3. 为了 Server Selection, select your server and click 下一个;
4. 为了 Server Roles, 选择 DHCP Server role;
5. In the pop-up window click 添加功能;
6. 点击 下一个;
7. 为了 特征, 点击 下一个;
8. 为了 DHCP Server, 点击 下一个;
9. 为了 Confirmation, 点击 安装;
10. Installation begins;
11. When complete, 点击 关闭;
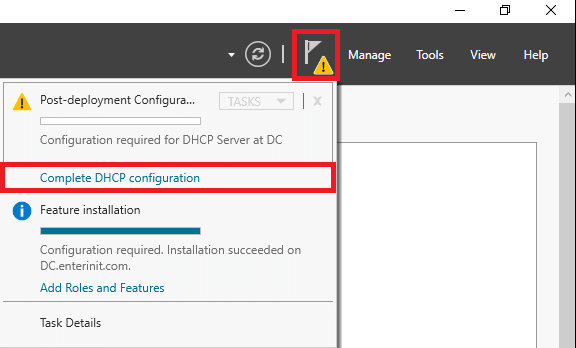
12. 点击 the yellow triangle in Server Manager, 然后单击 Complete DHCP configuration;
13. 为了 描述, 点击 下一个;
14. 为了 Authorization, 点击 Commit (also you may select the option Skip AD authorization and do authorization from DHCP console);
15. 为了 概括, 点击 关闭 (you must see 完毕 twice);
16. 跑步 the DHCP console from the apps list;
使用 PowerShell:
- 跑步 PowerShell as administrator;
2. Install DHCP Role;
Add-WindowsFeature DHCP3. Install DHCP console;
Add-WindowsFeature RSAT-DHCP4. For DHCP authorization enter;
Add-DHCPServerInDC5. After that go to 服务器管理器. 点击 the yellow triangle, and click Complete DHCP configuration. For Description, click Next. For Authorization, select the option Skip AD authorization and click Commit;
6. Get all commands for DHCP in PowerShell;
Import-Module dhcpserverGet-Command -Module dhcpserver


")


