Installer Active Directory sur Windows Server 2016.
NOTE: Avant d'installer le Rôle AD, vous devez installer le Rôle DNS. (DNS – composant requis pour AD)
Installer les services de domaine Active Directory avec l'interface graphique (interface graphique)
1. Démarrez votre serveur et démarrez le Gestionnaire de serveur console (par défaut démarre après la connexion de l'utilisateur);
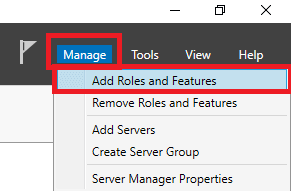
2. Cliquez sur Gérer (menu supérieur) et cliquez Ajouter des rôles et des fonctionnalités;
3. Cliquez sur le suivant bouton;
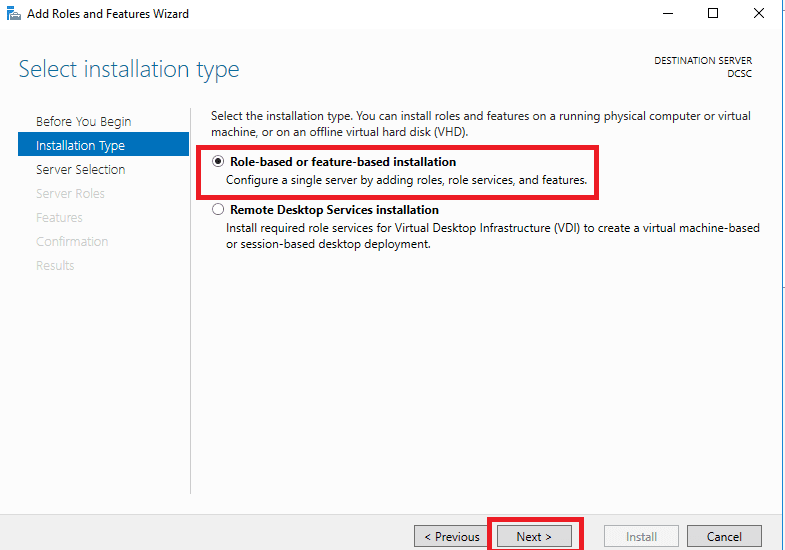
4. Sélectionner Installation basée sur les rôles ou les fonctionnalités et cliquez Suivant bouton;
5. Sélectionnez votre serveur cible (dans mon cas c'est un seul) et cliquez sur le Suivant bouton;
6. Cochez la case Services de domaine Active Directory (AJOUTE);

7. Dans la fenêtre contextuelle, cliquez sur Ajouter des fonctionnalités bouton (ajouté quelques outils de gestion AD);

8. Cliquez sur Suivant bouton;

9. Pour l'instant nous n'en avons pas besoin Caractéristiques, alors clique Suivant;

10. Lisez le court texte sur AD et cliquez sur le Suivant bouton;
11. Vous pouvez cocher la case Redémarrer automatiquement le serveur de destination si nécessaire (par défaut non requis). Clique le Installer bouton;
12. Une fois l'installation terminée, cliquez sur le Fermer bouton;
13. Une fois l'installation du rôle terminée, vous verrez un triangle jaune dans le menu supérieur. Cliquez dessus pour afficher la liste suivante, Cliquez sur Promouvoir ce serveur en contrôleur de domaine (pour faire de cet appareil un contrôleur de domaine, alias DC);

14. Sélectionner Ajouter une nouvelle forêt (dans mon cas c'est un nouveau DC et une nouvelle forêt), et entrez le nom de domaine racine (c'est notre futur domaine). Clique le Suivant bouton;

15. Sélectionnez votre:
- Niveau fonctionnel de la forêt;
- Niveau fonctionnel du domaine;
Tapez le mot de passe DSRM (rends-le fort, nécessaire pour une future restauration s'il tombait) et cliquez le suivant bouton;

16. Si vous avez un DNS parent, cliquez sur Montre plus;
17. Lisez le court texte sur la délégation DNS et cliquez sur le bouton OK. Si nécessaire- créer une délégation DNS. Si vous n'avez pas besoin de Créer une délégation DNS (par exemple) - Cliquez sur le suivant bouton;

18. Entrer Le nom de domaine NetBIOS de votre domaine et cliquez le suivant bouton;
19. Si besoin – spécifiez l'emplacement des objets AD DS, et cliquez sur le Suivant bouton;
20. Lire les informations récapitulatives, et si tout va bien cliquez le suivant bouton;
21. Après avoir vérifié les pré-requis, cliquez sur Installer;

22. L'installation a commencé;
23. Une fois l'installation terminée, vous obtenez une fenêtre contextuelle sur la déconnexion et le redémarrage du système. Vous pouvez cliquer sur le Fermer bouton ou attendre pour redémarrer;
24. Redémarrage du système;
25. Après le redémarrage, vous verrez, que vous pouvez vous connecter en tant que Administrateur de domaine;
26. Après la connexion au système, lorsque la console du gestionnaire de serveur apparaît, vous verrez le rôle installé ANNONCE DS;

Installer les services de domaine Active Directory avec Windows Powershell
La première chose à faire est d'ouvrir WindowsPowerShell. Une fois que vous êtes connecté au système et que vous êtes confronté à la ligne de commande, tapez simplement PowerShell (dans Windows Core). Pour l'exécution de l'interface de bureau PowerShell (Administrateur).
1. Exécuter:
Get-WindowsFeature2. Une fois la commande terminée avec succès, vous serez présenté avec tous les désinstallés, mais disponible, modules.
3. Une fois que nous avons compris le nom du service et le nom du module, nous devons maintenant aller de l'avant et l'installer.
Install-WindowsFeature AD-Domain-ServicesCette commande extraira tous les fichiers binaires requis et lancera la procédure d'installation.
4. Créons une nouvelle forêt.
Import-Module ADDSDeploymentNOTE: Si la commande est terminée avec succès, vous serez confronté à une invite vide.
5. Maintenant, vous devrez promouvoir votre serveur en contrôleur de domaine selon vos besoins - il existe plusieurs commandes que vous pouvez utiliser pour ce faire.
| Commande | Description |
| Ajouter-ADDSReadOnlyDomainControllerAccount | Installer un contrôleur de domaine en lecture seule |
| Installer-ADDSDomain | Installer le premier contrôleur de domaine dans un domaine enfant ou arborescent |
| Installer-ADDSDomainController | Installer un contrôleur de domaine supplémentaire dans un domaine |
| Installer-ADDSForest | Installer le premier contrôleur de domaine dans la nouvelle forêt |
| Test-ADDSDomainControllerInstallation | Vérifier les prérequis pour installer un contrôleur de domaine supplémentaire dans un domaine |
| Test-ADDSDomainControllerUninstallation | Désinstaller les services AD du serveur |
| Test-ADDSDomainInstallation | Vérifier les prérequis pour installer le premier contrôleur de domaine dans un domaine enfant ou arborescent |
| Test-ADDSForestInstallation | Installer le premier contrôleur de domaine dans la nouvelle forêt |
| Test-ADDSReadOnlyDomainControllAccountCreation | Vérifier les prérequis pour installer un contrôleur de domaine en lecture seule |
| Désinstaller-ADDSDomainController | Désinstaller le contrôleur de domaine du serveur |
Pour installer Active Directory avec la configuration par défaut, exécuter la commande suivante:
Install-ADDSForestCela installera les caractéristiques et fonctions de base, cependant, si vous souhaitez installer une configuration personnalisée:
Install-ADDSForest
 -CreateDnsDelegation:$false
 -DatabasePath “C:\Windows\NTDS”
 -DomainMode “Win2012R2”
 -DomainName “yourdomain.com”
 -DomainNetbiosName “YOURDOMAIN”
 -ForestMode “Win2016”
 -InstallDns:$true
 -LogPath “C:\Windows\NTDS”
 -NoRebootOnCompletion:$false
 -SysvolPath “C:\Windows\SYSVOL”
 -Force:$true
Une fois que vous exécutez ceci, il vous sera demandé d'entrer SafeModeAdministratorPassword - c'est pour le mode de restauration des services d'annuaire (DSRM). Une fois que vous avez défini ce mot de passe ici, Windows terminera l'installation et la configuration d'AD sur votre serveur Windows en fonction de l'entrée fournie.
6. L'Active Directory va maintenant installer. Vous pouvez recevoir divers avertissements, selon que vous avez des IP statiques ou non. Votre serveur peut également redémarrer automatiquement pendant ce processus.


impressionnant