Ao usar este site, você concorda com o política de Privacidade.
Aceitar
Entrar em TIEntrar em TIEntrar em TI
  • LAR
  • PROFISSIONAL DE TI
  • TECNOLOGIA
  • Microsoft
    • Azul
    • Configmgr/sccm
    • PMD
    • Orquestrador
    • Hiper-V
    • Microsoft Edge Insider
    • Msi
    • Escritório 365
    • Insider Office
    • Power bi
    • Skype
    • Servidor SQL
    • Equipes
  • WINDOWS
    • Centro de Administração do Windows
    • Cliente Windows
    • Servidor Windows
  • Lista de coleta de consultas SCCM
Leitura: Configuration Manager Discovery Methods Configuration Guide
Redimensionador de fontesAh
Entrar em TIEntrar em TI
Redimensionador de fontesAh
  • LAR
  • PROFISSIONAL DE TI
  • TECNOLOGIA
  • Microsoft
  • WINDOWS
  • Lista de coleta de consultas SCCM
Procurar
  • LAR
  • PROFISSIONAL DE TI
  • TECNOLOGIA
  • Microsoft
    • Azul
    • Configmgr/sccm
    • PMD
    • Orquestrador
    • Hiper-V
    • Microsoft Edge Insider
    • Msi
    • Escritório 365
    • Insider Office
    • Power bi
    • Skype
    • Servidor SQL
    • Equipes
  • WINDOWS
    • Centro de Administração do Windows
    • Cliente Windows
    • Servidor Windows
  • Lista de coleta de consultas SCCM
Configmgr

Configuration Manager Discovery Methods Configuration Guide

Publicado: Fevereiro 11, 2024
3 Leitura mínima
COMPARTILHAR

Configuration Manager Discovery Methods Configuration Guide | Step-by-Step Tutorial. Neste post, Nós configuramos “Discovery Methods” in SCCM. ““Discovery Methods” help you discover new computers and users in your infrastructure.

1. Start your SCCM Console and go to “Administração““;

2. Vá para "Overview\Hierarchy Configuration\Discovery Methods““;

3. First config “Active Directory Forest Discovery““.

4. Select and click the button “Propriedades” or click Botão direito do mouse and select “Propriedades““;

5. Set the checkmark “Enable Active Directory Forest Discovery“. If you wish to create boundaries by AD sites – set a checkmark. If you wish to create IP address range boundaries – set a checkmark. Schedule “Run time” and click the “OK" botão;
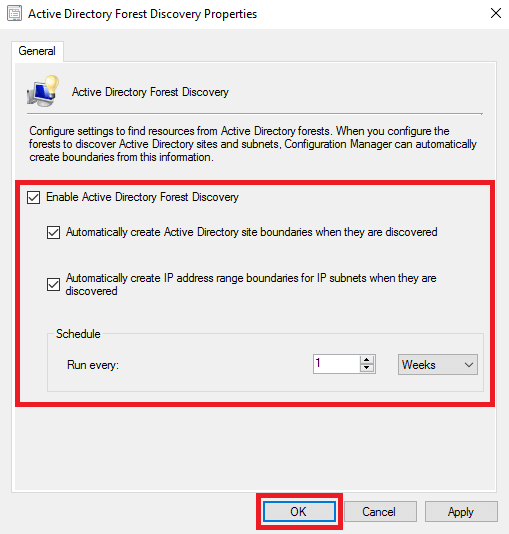
6. If you wish to start discovering now – click the “Sim” button in the pop-up window;

7. In my LAB and Enterprise deployment I don’t use “Active Directory Group Discovery““, so I skip it;

8. Select and open properties (see step “4““) for “Active Directory System Discovery““;

9. Set the checkmark “Enable Active Directory System Discovery“. Click on the button to add an AD container (Veja a captura de tela);

10. Clique no “Navegar” button and select AD container for discovering. Também, you may select more options for searching. After selecting click “OK" botão;
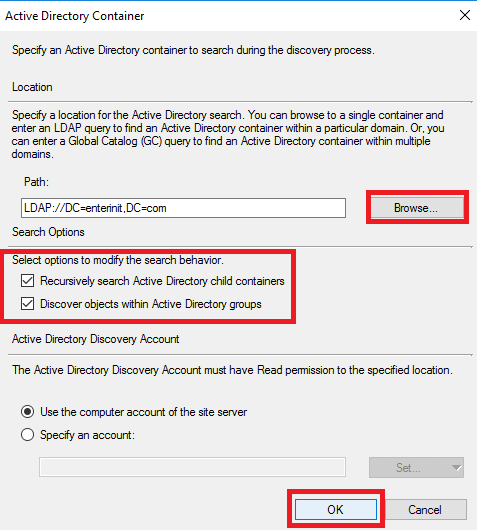
11. Ok, we add the AD container;

12. You can schedule “Full” and “Delta” discovery in the “Polling Schedule” bookmark;

13. Também, you may add more attributes for importing to SCCM in the “Active Directory Attributes” bookmark;
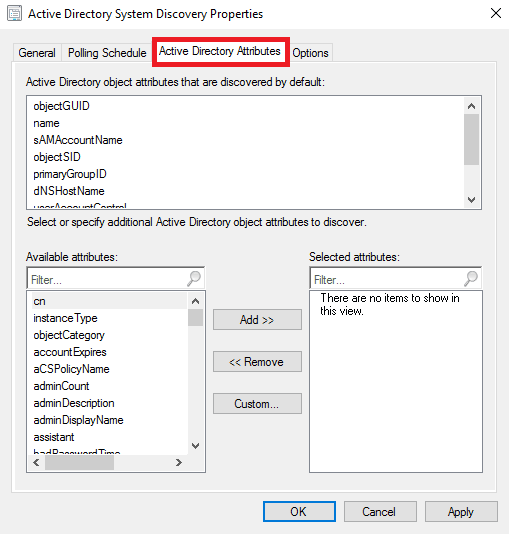
14. And config excluded options in the “Options” bookmark. When you finish – click the “OK" botão;

15. Select and open properties for “Active Directory User Discovery” (Botão direito do mouse click and select “Propriedades” or “Propriedades” button in the upper menu);

16. Set the checkmark “Enable Active Directory User Discovery” and add the AD container by clicking a button (Veja a captura de tela);

17. Clique no “Navegar” button and select the AD container. Add search options and click the “OK" botão;
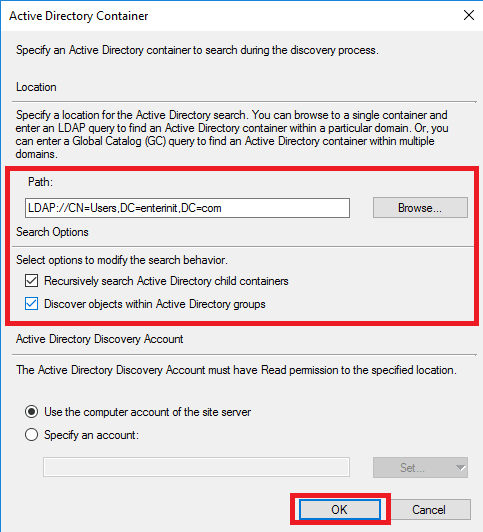
18. Open the “Polling Schedule” bookmark. Config scheduling for “Full” and “Delta” discovering;

19. In the bookmark “Active Directory Attributes” you can add more attributes for importing to SCCM from AD. When finished click the “OK" botão;

20. In the pop-up window click the “Sim” button to run discovery as soon as possible;

21. I don’t use “Network Discovery““, so I skip it;

22. Open “Heartbeat Discovery” properties;

23. Set checkmark “Enable Heartbeat Discovery” and config interval. When finished click the “OK" botão;

MARCADO:Diretório AtivoCentral do SistemaGerenciador de configuração do System CenterPrévia técnica
Artigo Anterior Lista de coleta de consultas do Configuration Manager Automatic deployment rule failed with error code 0X87D20417
Próximo artigo Lista de coleta de consultas do Configuration Manager Controlling reboot timeout and reboot message when using Install Software Updates in a Task Sequence
Deixe um comentário Deixe um comentário

Deixe uma resposta Cancelar resposta

Seu endereço de e-mail não será publicado. Os campos obrigatórios estão marcados *

Este site usa Akismet para reduzir spam. Saiba como os dados dos seus comentários são processados.

Tradução

English中文(简体)DanskNederlandsFrançaisDeutschItaliano한국어PolskiPortuguêsRomânăEspañolУкраїнська
por Transposh - translation plugin for wordpress

Postagens populares

Requisitos do sistema para Windows Server 2016
Servidor Windows
Lista de coleta de consultas do Configuration Manager
Configmgr
Navegação estruturada/gerenciada habilitada em páginas modernas em sites de equipe clássicos
Tecnologia
SCCM Falha ao obter locais de DP como a versão esperada do MP
Configmgr

Postagens recentes

Instalando e configurando Fail2ban para proteção SSH no Ubuntu 24.04
Linux
Habilitando e configurando FirewallD no AlmaLinux
Linux
Criação de usuário e configuração de chave SSH no AlmaLinux
Linux
Como redefinir a senha no AlmaLinux
Linux

© 2023 Entrar em TI

Vá para a versão móvel
Bem vindo de volta!

Faça login na sua conta

Nome de usuário ou endereço de e-mail
Senha

Perdeu sua senha?