By using this site, you agree to the Privacy Policy.
Accept
EnterinITEnterinITEnterinIT
  • HOME
  • IT PRO
  • TECH
  • MICROSOFT
    • Azure
    • ConfigMgr/SCCM
    • DPM
    • Orchestrator
    • Hyper-V
    • Microsoft Edge Insider
    • MSI
    • Office 365
    • Office Insider
    • Power BI
    • Skype
    • SQL Server
    • Teams
  • WINDOWS
    • Windows Admin Center
    • Windows Client
    • Windows Server
  • SCCM Query Collection List
Reading: Actions with VM in Hyper-V Windows 10: A Guide to Managing Virtual Machines
Font ResizerAa
EnterinITEnterinIT
Font ResizerAa
  • HOME
  • IT PRO
  • TECH
  • MICROSOFT
  • WINDOWS
  • SCCM Query Collection List
Search
  • HOME
  • IT PRO
  • TECH
  • MICROSOFT
    • Azure
    • ConfigMgr/SCCM
    • DPM
    • Orchestrator
    • Hyper-V
    • Microsoft Edge Insider
    • MSI
    • Office 365
    • Office Insider
    • Power BI
    • Skype
    • SQL Server
    • Teams
  • WINDOWS
    • Windows Admin Center
    • Windows Client
    • Windows Server
  • SCCM Query Collection List
Hyper-V

Actions with VM in Hyper-V Windows 10: A Guide to Managing Virtual Machines

Published: February 4, 2024
2 Min Read
SHARE

Actions with VM in Hyper-V Windows 10: A Guide to Managing Virtual Machines. Some useful info about what you can do with Virtual Machine (VM) in Hyper-V Manager.

1. Import Virtual Machine – you may import to your Hyper-V early exported VM;

2. Edit Disk – edit selected Hyper-V Virtual Disk (as example);

3. Inspect Disk – show short information about selected Hyper-V Virtual Disk;

  • Run your Hyper-V Manager, click on “Inspect Disk“;
  • Select your “Virtual Disk” and press “Open“;
  • Check the information and press “Close“.

4. Connect – connect to selected Virtual Machine to work with it;

5. Setting – open VM settings;

6. Start – “Power-on” machine (if VM in “Off” state);

7. Checkpoint – create new checkpoint for VM;

8. Move – you can “Move” VM files and disks to another location;

9. Export – export VM for future import at another server;

Best Practices:

  • Disconnect “Virtual Disk” from VM;
  • Copy it to destination folder at another server;
  • “Export” your VM;
  • Go to another server and do “Import Virtual Machine“;
  • Connect your early copied “Virtual Disk” and “Start” VM

10. Rename – rename the name of a VM in Hyper-V Manager (change only visible name, NOT folder or “Virtual Disk” name);

  • Run your Hyper-V manager and select “Virtual Machine“;
  • Click “Rename” and enter a new name;
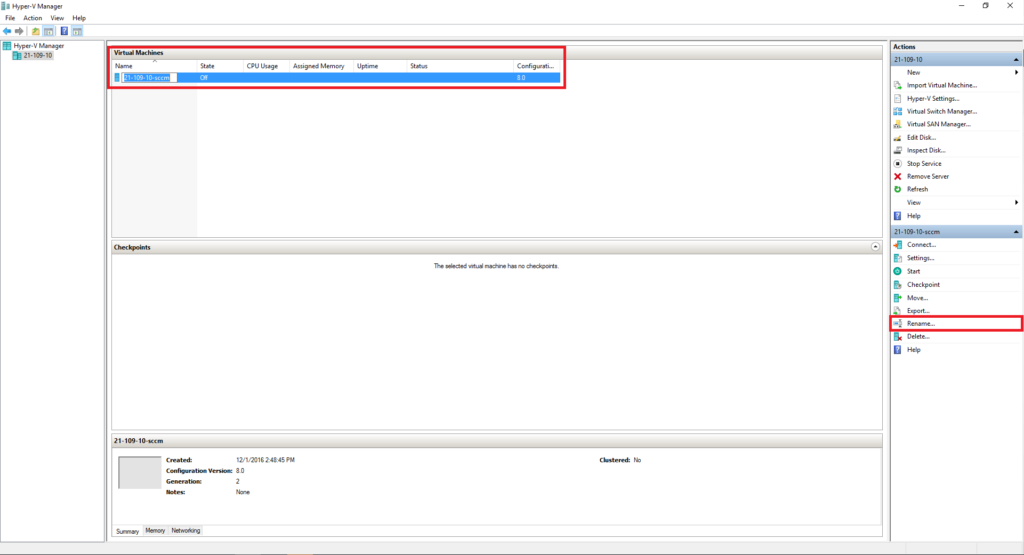
  • Press “Enter” on your keyboard.

11. Delete – delete VM from Hyper-V manager and VMs configuration file (after that manually delete “Virtual Disk“);

12. Help – don’t need an introduction.

TAGGED:Microsoft Hyper-VWindowsWindows 10
Next Article How to Create a Virtual Machine in Windows 10 using Hyper-V Manager, PowerShell, and Quick Create
Leave a Comment Leave a Comment

Leave a Reply Cancel reply

Your email address will not be published. Required fields are marked *

This site uses Akismet to reduce spam. Learn how your comment data is processed.

Translation

English中文(简体)DanskNederlandsFrançaisDeutschItaliano한국어PolskiPortuguêsRomânăEspañolУкраїнська
by Transposh - translation plugin for wordpress

Popular Posts

System Requirements for Windows Server 2016
Windows Server
Configuration Manager Query Collection List
ConfigMgr
Structured/Managed Navigation enabled on Modern Pages in Classic Team Sites
Tech
SCCM Failed to get DP locations as the expected version from MP
ConfigMgr

Recent Posts

Windows 10 Hyper-V VM Settings
Hyper-V
A Beginner’s Guide to Configuring Hyper-V on Windows 10
Hyper-V
Configuration Manager Query Collection List
SCCM Current Branch Update 1610
ConfigMgr
Configuration Manager Query Collection List
Configuration Manager Client Cache Cleanup Script
ConfigMgr

© 2023 EnterinIT

Go to mobile version
Welcome Back!

Sign in to your account

Username or Email Address
Password

Lost your password?