A Step-by-Step Guide to Configuring DHCP on Windows Server 2016 Using GUI and PowerShell.
With GUI
1. Run the DHCP console from the apps list. Navigate to IPv4\Server Options. There we config Server options for all scopes;
2. Right Mouse Button click at Server Options and click Configure Options;
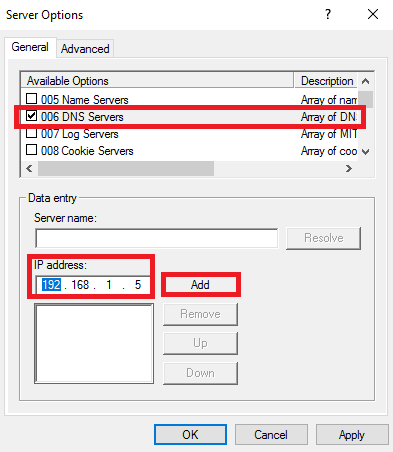
3. Select option 006 DNS Servers, enter an IP address, and click Add;
4. Select option 015 DNS Domain Name, enter the domain name, and click OK;
5. New options added;
6. Right Mouse Button click at IPv4 and click New Scope;
7. Click Next;
8. Enter Name (and if you wish Description), and click Next;
9. Enter the Start IP address, End IP address, and Subnet mask, and click Next;
10. On this page, you may exclude the IP range from DHCP. Click Next;
11. Set Lease Duration and click Next;
12. You may select Yes and configure Scope Options for this scope. I choose No, click Next;
13. Click Finish;
14. Scope created, but we must Activate it;
15. Right Mouse Button click at the scope and click Activate;
16. Scope activated and worked!
17. If you Right Mouse Button click on Leased IP Address, you may Add to the reservation Add to the filter, or even Delete it;
With PowerShell
1. Run PowerShell as Administrator. To get active scopes enter:
Get-DhcpServerv4Scope -cn <dhcp server name> | select scopeid, name, description2. To add new scope, enter:
Add-DhcpServerv4Scope -Name ‘<scope name>’ -StartRange <start IP Address> -EndRange <end IP Address> -SubnetMask <subnet mask> -Description ‘<description>’ –cn <dhcp server name>3. Before scope delete Best Practices is run the command with WhatIf parameter:
Remove-DhcpServerv4Scope -ScopeId <scope id> -cn <dhcp server name> -WhatIf4. Then run without the WhatIf parameter:
Remove-DhcpServerv4Scope -ScopeId <scope id> -cn <dhcp server name>5. Scope removed.

")


