Windows Server에서 DHCP를 구성하는 단계별 가이드 2016 GUI 및 PowerShell 사용.
GUI 사용
1. 달리다 그만큼 DHCP console from the apps list. 로 이동 IPv4\Server Options. There we config Server options for all scopes;
2. 마우스 오른쪽 버튼 click at Server Options 그리고 클릭 Configure Options;
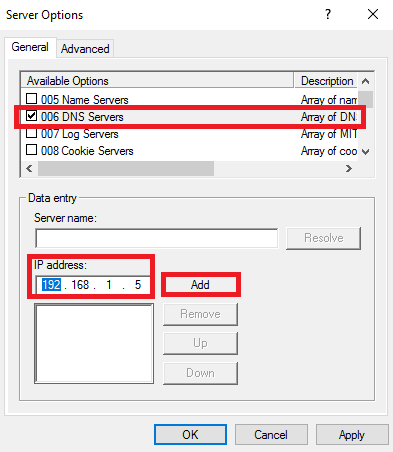
3. Select option 006 DNS Servers, 입력하다 an IP address, 그리고 클릭 추가하다;
4. Select option 015 DNS Domain Name, enter the domain name, 그리고 클릭 좋아요;
5. New options added;
6. 마우스 오른쪽 버튼 click at IPv4 그리고 클릭 New Scope;
7. 딸깍 하는 소리 다음;
8. 입력하다 이름 (and if you wish 설명), 그리고 클릭 다음;
9. 입력하다 the Start IP address, End IP address, 그리고 Subnet mask, 그리고 클릭 다음;
10. On this page, you may exclude the IP range from DHCP. 딸깍 하는 소리 다음;
11. 세트 Lease Duration 그리고 클릭 다음;
12. You may select 예 and configure Scope Options for this scope. 나는 선택한다 아니요, 딸깍 하는 소리 다음;
13. 딸깍 하는 소리 마치다;
14. Scope created, but we must Activate 그것;
15. 마우스 오른쪽 버튼 click at the scope and click Activate;
16. Scope activated and worked!
17. If you 마우스 오른쪽 버튼 클릭 Leased IP Address, you may Add to the reservation Add to the filter, or even 삭제 그것;
PowerShell 사용
1. 달리다 파워셸 as Administrator. To get active scopes enter:
Get-DhcpServerv4Scope -cn <dhcp server name> | select scopeid, name, description2. To add new scope, 입력하다:
Add-DhcpServerv4Scope -Name ‘<scope name>’ -StartRange <start IP Address> -EndRange <end IP Address> -SubnetMask <subnet mask> -Description ‘<description>’ –cn <dhcp server name>3. Before scope delete Best Practices is run the command with WhatIf parameter:
Remove-DhcpServerv4Scope -ScopeId <scope id> -cn <dhcp server name> -WhatIf4. Then run without the WhatIf parameter:
Remove-DhcpServerv4Scope -ScopeId <scope id> -cn <dhcp server name>5. Scope removed.


