
Una guida dettagliata alla configurazione di DHCP su Windows Server 2016 Utilizzo dell'interfaccia grafica e di PowerShell.
Con GUI
1. Correre IL Consolle DHCP dall'elenco delle app. Navigare verso IPv4Opzioni server. Lì configuriamo le opzioni del server per tutti gli ambiti;
2. Pulsante destro del mouse clicca su Opzioni server e clicca Configura opzioni;
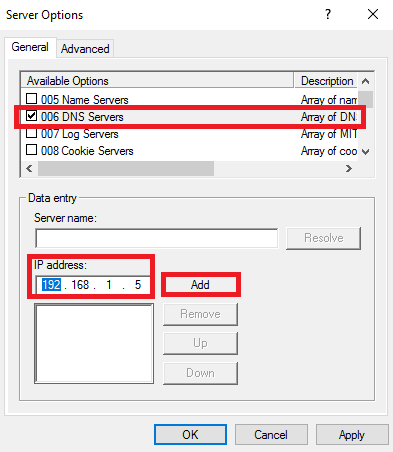
3. Selezionare l'opzione 006 Server DNS, accedere un indirizzo IP, e clicca Aggiungere;
4. Selezionare l'opzione 015 Nome di dominio DNS, inserire il nome del dominio, e clicca OK;
5. Aggiunte nuove opzioni;
6. Pulsante destro del mouse clicca su IP v4 e clicca Nuovo ambito;
7. Clic Prossimo;
8. accedere Nome (e se lo desideri Descrizione), e clicca Prossimo;
9. accedere l'indirizzo IP iniziale, Indirizzo IP finale, E Maschera di sottorete, e clicca Prossimo;
10. Su questa pagina, potresti escludere l'intervallo IP dal DHCP. Clic Prossimo;
11. Impostato Durata della locazione e clicca Prossimo;
12. Puoi selezionare SÌ e configurare Opzioni ambito per questo ambito. scelgo NO, clic Prossimo;
13. Clic Fine;
14. Ambito creato, ma dobbiamo Attivare Esso;
15. Pulsante destro del mouse fare clic sull'ambito e fare clic Attivare;
16. Ambito attivato e funzionante!
17. Se tu Pulsante destro del mouse clicca su Indirizzo IP affittato, potresti Aggiungi al prenotazione Aggiungi al filtro, o anche Eliminare Esso;
Con PowerShell
1. Correre PowerShell come Amministratore. Per ottenere gli ambiti attivi, immettere:
Get-DhcpServerv4Scope -cn <dhcp server name> | select scopeid, name, description2. Per aggiungere un nuovo ambito, accedere:
Add-DhcpServerv4Scope -Name ‘<scope name>’ -StartRange <start IP Address> -EndRange <end IP Address> -SubnetMask <subnet mask> -Description ‘<description>’ –cn <dhcp server name>3. Prima dell'eliminazione dell'ambito Migliori pratiche viene eseguito il comando con Cosa succede se parametro:
Remove-DhcpServerv4Scope -ScopeId <scope id> -cn <dhcp server name> -WhatIf4. Quindi corri senza il WhatIf parametro:
Remove-DhcpServerv4Scope -ScopeId <scope id> -cn <dhcp server name>5. Ambito rimosso.


