Un ghid pas cu pas pentru configurarea DHCP pe Windows Server 2016 Folosind GUI și PowerShell.
Cu GUI
1. Alerga cel Consola DHCP din lista de aplicații. Navigheaza catre IPv4\Server Options. Acolo configurăm opțiunile Server pentru toate domeniile;
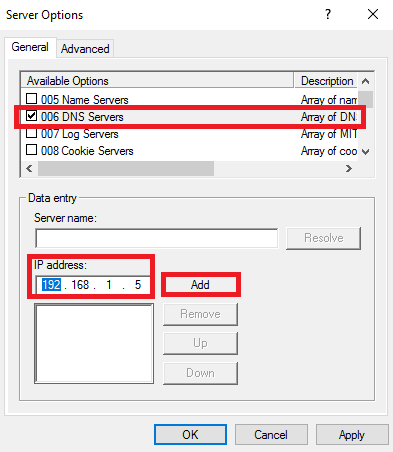
2. Butonul din dreapta al mouse-ului faceți clic pe Opțiuni server și faceți clic Configurați Opțiuni;
3. Selectați opțiunea 006 Servere DNS, introduce o adresă IP, și faceți clic Adăuga;
4. Selectați opțiunea 015 Nume de domeniu DNS, introduceți numele domeniului, și faceți clic Bine;
5. S-au adăugat noi opțiuni;
6. Butonul din dreapta al mouse-ului faceți clic pe IPv4 și faceți clic Noua Domeniu de aplicare;
7. Clic Următorul;
8. introduce Nume (si daca doriti Descriere), și faceți clic Următorul;
9. introduce adresa IP de pornire, Adresa IP finală, și Mască de rețea, și faceți clic Următorul;
10. Pe aceasta pagina, poți exclude intervalul IP de la DHCP. Clic Următorul;
11. A stabilit Durata de închiriere și faceți clic Următorul;
12. Puteți selecta da și configurați Opțiuni de aplicare pentru acest domeniu de aplicare. aleg Nu, clic Următorul;
13. Clic finalizarea;
14. Sfera creată, dar trebuie Activati aceasta;
15. Butonul din dreapta al mouse-ului faceți clic pe domeniul de aplicare și faceți clic Activati;
16. Sfera activată și funcționată!
17. daca tu Butonul din dreapta al mouse-ului Click pe Adresă IP închiriată, poţi Adăugați la rezervare Adăugați la filtru, sau chiar Șterge aceasta;
Cu PowerShell
1. Alerga PowerShell în calitate de Administrator. Pentru a obține domenii active, intrați:
Get-DhcpServerv4Scope -cn <dhcp server name> | select scopeid, name, description2. Pentru a adăuga un domeniu nou, introduce:
Add-DhcpServerv4Scope -Name ‘<scope name>’ -StartRange <start IP Address> -EndRange <end IP Address> -SubnetMask <subnet mask> -Description ‘<description>’ –cn <dhcp server name>3. Înainte de a șterge domeniul Cele mai bune practici se execută comanda cu Și dacă parametru:
Remove-DhcpServerv4Scope -ScopeId <scope id> -cn <dhcp server name> -WhatIf4. Apoi fugi fără The What If parametru:
Remove-DhcpServerv4Scope -ScopeId <scope id> -cn <dhcp server name>5. Domeniul de aplicare a fost eliminat.


