A Step-by-Step Guide to Configuring DHCP on Windows Server 2016 Using GUI and PowerShell.
With GUI
1. Τρέξιμο ο DHCP console from the apps list. Πλοηγηθείτε στο IPv4\Server Options. There we config Server options for all scopes;
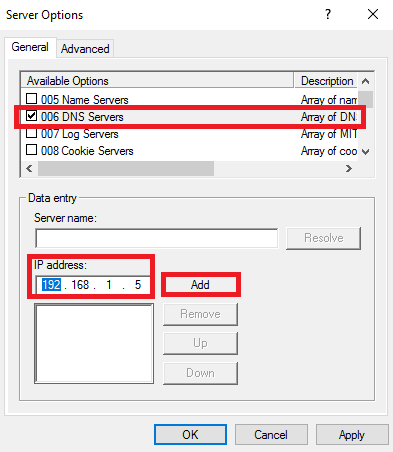
2. Δεξί κουμπί του ποντικιού click at Server Options και κάντε κλικ Configure Options;
3. Select option 006 DNS Servers, εισαγω an IP address, και κάντε κλικ Προσθήκη;
4. Select option 015 DNS Domain Name, enter the domain name, και κάντε κλικ Εντάξει;
5. New options added;
6. Δεξί κουμπί του ποντικιού click at IPv4 και κάντε κλικ New Scope;
7. Κάντε κλικ Επόμενο;
8. Εισαγω Ονομα (and if you wish Περιγραφή), και κάντε κλικ Επόμενο;
9. Εισαγω the Start IP address, End IP address, και Subnet mask, και κάντε κλικ Επόμενο;
10. On this page, you may exclude the IP range from DHCP. Κάντε κλικ Επόμενο;
11. Σειρά Lease Duration και κάντε κλικ Επόμενο;
12. You may select Ναί and configure Scope Options for this scope. διαλέγω No, Κάντε κλικ Επόμενο;
13. Κάντε κλικ Φινίρισμα;
14. Scope created, but we must Activate το;
15. Δεξί κουμπί του ποντικιού click at the scope and click Activate;
16. Scope activated and worked!
17. If you Δεξί κουμπί του ποντικιού κάντε κλικ στο Leased IP Address, you may Add to the reservation Add to the filter, or even Διαγράφω το;
With PowerShell
1. Τρέξιμο PowerShell as Administrator. To get active scopes enter:
Get-DhcpServerv4Scope -cn <dhcp server name> | select scopeid, name, description2. To add new scope, εισαγω:
Add-DhcpServerv4Scope -Name ‘<scope name>’ -StartRange <start IP Address> -EndRange <end IP Address> -SubnetMask <subnet mask> -Description ‘<description>’ –cn <dhcp server name>3. Before scope delete Βέλτιστες πρακτικές is run the command with WhatIf parameter:
Remove-DhcpServerv4Scope -ScopeId <scope id> -cn <dhcp server name> -WhatIf4. Then run without the WhatIf parameter:
Remove-DhcpServerv4Scope -ScopeId <scope id> -cn <dhcp server name>5. Scope removed.


