SCCM 요구 사항 설치 가이드: SQL 구성, Active Directory 스키마 확장 및 Windows 서버 역할 설치.
SQL 구성
For normal work, you must use the next memory size for SCCM SQL:
- 최저한의 8192 for “Primary Site“;
- 최저한의 4096 for “Secondary Site“;
When you use a database server that is co-located with the site server, dedicate 50 percent of the available addressable system memory for SQL Server.
When you use a dedicated SQL Server, dedicate 80 percent of the available addressable system memory for SQL Server.
Configuration Manager requires SQL Server to reserve a minimum of 8 gigabytes (GB) of memory in the buffer pool used by an instance of SQL Server for the central administration site and primary site and a minimum of 4 gigabytes (GB) for the secondary site. This memory is reserved by using the Minimum server memory setting under Server Memory Options and is configured by using SQL Server Management Studio.”
Technet
나의 경우에는, I have very weak SQL, so I only show where and how to set these limits.
1. Run “Microsoft SQL Server 관리 스튜디오“;
2. Connect to your “SCCM Instance”. Enter “서버 이름"를 클릭하고 "연결하다” 버튼;
3. 마우스 오른쪽 버튼 click on the instance and select “속성“;
4. 이동 "Memory” and set “Minimum server memory (in MB)” and “Maximum server memory (in MB)” according to the information I wrote earlier. "를 클릭합니다.좋아요” 버튼;

5. To apply these changes you must restart instance services, you can do it from “Microsoft SQL Server 관리 스튜디오“. 마우스 오른쪽 버튼 click on the instance and select “재시작“;
6. "를 클릭합니다.예” on pop-up windows;
Active Directory schema extending
When you extend the Active Directory schema for System Center 2012 Configuration Manager, you can publish site information to Active Directory Domain Services. Extending the Active Directory schema is optional for Configuration Manager. 하지만, by extending the schema you can use all Configuration Manager features and functionality with the least amount of administrative overhead.
If you decide to extend the Active Directory schema, you can do so before or after you run Configuration Manager Setup.
TechNe
1. Log in to your “Domain Controller Schema Master“. Mount “*.iso” with SCCM installation files. 이동 "<드라이브 문자>\SMSSETUP\BIN\X64” and run “extadsch.exe“;
2. After step “1” go to “씨:\” 및 열기 “ExtADSch.log” if all is good you must see the next string;

3. Open your apps list and run “ADSI Edit“;

4. 마우스 오른쪽 버튼 click on “ADSI Edit"를 선택하고 "Connect to“;
5. Leave defaults and click the “좋아요” 버튼;
6. Find “CN=System” in the list. 마우스 오른쪽 버튼 click on “CN=System“, select “새로운” and then “Object“;

7. In the list select “Container"를 클릭하고 "다음” 버튼;

8. Enter “Value” System Management and click the “다음” 버튼;
9. "를 클릭합니다.마치다” 버튼;
10. 마우스 오른쪽 버튼 click on “CN=System Management"를 클릭하고 "속성“;
11. Select “보안“;
12. "를 클릭합니다.추가하다” 버튼;
13. In the “Object Types” add “컴퓨터“, enter your SCCM server name, and click the “좋아요” 버튼;

14. Set the checkmark “Full control” (like on the screenshot) and click the “좋아요” 버튼;

Windows Server Roles and Features installation
My deployment scenario:
- SQL 2016 ~에 윈도우 서버 2016 with separated disks (체계, DB’s, Temp);
- SCCM 1606 ~에 윈도우 서버 2016 with two disks (one for the system and one for data, like updates and apps)
1. Let’s make some tuning of our server. I need to host SCCM data on disk “D“. To do this we must create a blank file “NO_SMS_ON_DRIVE.SMS” in the root of disk “씨“;

2. Make sure it is blank;
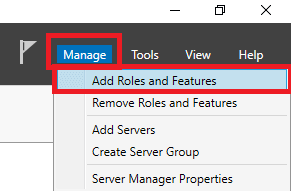
3. Next we need at Windows Server Roles and Features. In the “서버 매니저” in the upper menu click “관리하다” and then “Add Roles and Features“;
4. "를 클릭합니다.다음” 버튼. (you may set the checkmark “기본적으로 이 페이지 건너뛰기” and this window don’t appear next time);
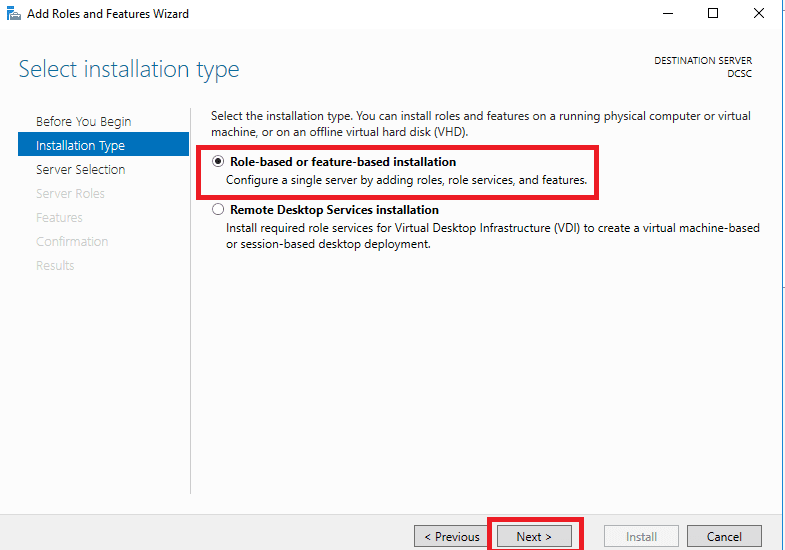
5. Leave by default “역할 기반 또는 기능 기반 설치"를 클릭하고 "다음” 버튼;
6. Select the target server and click the “다음” 버튼 (I have only one server);
7. Set a check mark on the “웹 서버 (IIS)” role, in the pop-up window click the “기능 추가” 버튼;
” role, in the pop-up window click the “기능 추가” 버튼;
8. Set the check mark on “Windows Server Update Services (WSUS)“, in the pop-up window click the “기능 추가” 버튼;

9. After all steps click the “다음” 버튼;
10. Set check mark on “.넷 프레임 워크 3.5 특징” and set check marks, like on the screenshot;

11. Set check mark on “Background Intelligent Transfer Service (BITS)“;

12. In the pop-up window click “기능 추가“;
13. Set the check mark on “원격 차등 압축"를 클릭하고 "다음“;

메모: I use Server 2016, if you use another Windows Server (2012 또는 2012 R2) you must install WSUS 3.0 Service Pack 2.
14. Let’s configure “IIS Role“, and click the “다음” 버튼;
15. Set check marks, like on screenshots;


16. After all actions click the “다음” 버튼;
17. Let’s configure “WSUS Role“, and click the “다음” 버튼;
18. Set check marks on “WSUS Services“, I use the database on SCCM SQL Server, so I also set the checkmark “SQL Server Connectivity“. (If you want to use a local database for WSUS – don’t set the check mark on SQL and set the checkmark on “WID Connectivity“). "를 클릭합니다.다음” 버튼;

19. Set the checkmark and enter the path for storing updates (I use “D:\WSUS“). "를 클릭합니다.다음” 버튼;
20. Enter “<SQL Server 이름>\<Instance name>“, and click the “Check connection” button to check the connection. If all is good, "를 클릭다음” 버튼;
메모: I don’t have Internet access on this machine, so I need to specify the source path for feature installation (“.NET Framework 3.5“). Click “Specify an alternate source path“;

21. Enter “<windows source files DVD or *iso disk>\소스sxs"를 클릭하고 "좋아요” 버튼;
22. "를 클릭합니다.설치하다” 버튼;
23. 설치 시작;
24. When the installation is finished, "를 클릭닫다” 버튼;
25. Click on the yellow triangle and then click “Launch Post-Installation tasks” (finish WSUS installation);

26. Post-installation finished;
27. If you install WSUS with SQL database, go to SQL Server. You will see “SUSDB” file and “SUSDB” database in “SQL Server 관리 스튜디오“;
Windows ADK installation
Download the installation file from Windows ADK Site. You may install it from the WEB or download files to install it on another computer. Let’s do both options.
2. If you choose the online installation. Run the downloaded file “adksetup.exe“. Select “Install the Windows Assessment and Deployment Kit – Windows 10 to this computer“. "를 클릭합니다.다음” 버튼;
3. Select “예” or “아니요” (read the text in the window to make choice). "를 클릭합니다.다음” 버튼;
4. Read “License Agreement"를 클릭하고 "수용하다” 버튼;
5. Select components required for SCCM successful installation, like in the screenshot. Click the “Install” button to start the installation.

6. If you choose the offline installation. Select a folder to download installation files and click the “다음” 버튼;
7. Copy downloaded files to the target machine and run “adksetup.exe“;
8. "를 클릭합니다.다음” 버튼;
9. Next repeat steps “3-5“;
10. In both variants at the end of installation click the “Close” button. (Also you may explore Windows ADK documentation on MSDN if you need, by setting a checkmark);
메모: 설치 후 재부팅하는 것을 잊지 마십시오. It takes a very long time to install.